
 Raspberry con Owncloud Raspbian Buster Letsencrypt Apache
Guida su come realizzare un proprio server cloud, utilizzando owncloud, su raspberry pi 3/4, con Raspbian Buster, ma in alternativa si puo utilizzare un’altro modello di single board o Pc, con OS Debian based. Avevo gia fatto una guida precedentemente, utilizzando Raspbian Stretch. Inoltre utilizzando Let’s Encrypt si avranno certificati SSL gratuiti tramite un processo completamente automatizzato, progettato per eliminare la creazione manuale di certificati, per la convalida, l’installazione e il rinnovo. I certificati rilasciati da Let’s Encrypt sono validi per 90 giorni dalla data di emissione e sono oggi considerati affidabili da tutti i principali browser.
Prerequisiti ed info
- Negli esempi sotto utilizzerò come nome di dominio example.com ed i comandi verranno eseguiti da root
- Il raspberry dovrà avere quindi come dominio l’equivalente di example.com. Questo può essere modificato in /etc/hostname e poi riavviare.
- Il vostro ip pubblico dovrà puntare quindi al dominio, nel caso non si avesse un ip pubblico, utilizzare un servizio di DNS.
- Assicurarsi prima di aprire le porte 80/443 verso il proprio server, altrimenti non si potranno ottenere i certificati. Successivamente rimarrà aperta solo la 443.
- La guida è stata testata su una installazione pulita di Raspbian Buster
Raspberry con Owncloud Raspbian Buster Letsencrypt Apache
Step 1) Installare i pacchetti necessari:
$ sudo su
# apt update; apt upgrade
# apt install apache2 mariadb-server libapache2-mod-php7.3 php7.3-gd php7.3-json php7.3-mysql php7.3-curl php7.3-intl php-imagick php7.3-zip php7.3-xml php7.3-mbstring ntfs-3g fail2ban certbot
Step 2) Configurazione Apache e Virtual Host basic
# rm -rf /var/www/html/
# mkdir -p /var/www/example.com/public_html
# nano /var/www/example.com/public_html/index.html
ed incollare dentro:
<!DOCTYPE html>
<html lang="en" dir="ltr">
<head>
<meta charset="utf-8">
<title>Welcome to example.com</title>
</head>
<body>
<h1>Success! example.com home page!</h1>
</body>
</html
# nano /etc/apache2/sites-available/example.com.conf
ed incollare dentro:
<VirtualHost *:80>
ServerName example.com
ServerAlias www.example.com
ServerAdmin webmaster@example.com
DocumentRoot /var/www/example.com/public_html

<Directory /var/www/example.com/public_html>
Options -Indexes +FollowSymLinks
AllowOverride All
</Directory>

ErrorLog ${APACHE_LOG_DIR}/example.com-error.log
CustomLog ${APACHE_LOG_DIR}/example.com-access.log combined
</VirtualHost>
poi:
# chown -R www-data: /var/www/example.com/
# mv /etc/apache2/sites-available/000-default.conf 000-default.conf.bak
# mv /etc/apache2/sites-enabled/000-default.conf 000-default.conf.bak
# a2ensite example.com
# systemctl restart apache2
# systemctl enable apache2
a questo punto collegandosi al server dovremmo vedere che funziona:
 Step 3) Chiave e Letsencrypt
Creare una chiave robusta Dh (Diffie-Hellman) a 1024 oppure a 2048 bit, ci vorrà circa 20 minuti.
# openssl dhparam -out /etc/ssl/certs/dhparam.pem 1024
Per ottenere i certificati utilizzeremo certbot, installato precedentemente, che si occuperà dell’acquisizione e del rinnovo degli stessi. Utilizzeremo il plug-in Webroot che funziona creando un file temporaneo nella ${webroot-path}/.well-known/acme-challenge a cui si collegherà Letsencrypt per risolvere il DNS:
# mkdir -p /var/lib/letsencrypt/.well-known
# chgrp www-data /var/lib/letsencrypt
# chmod g+s /var/lib/letsencrypt
creare primo file di configurazione:
# nano /etc/apache2/conf-available/letsencrypt.conf
ed incollare dentro:
Alias /.well-known/acme-challenge/ "/var/lib/letsencrypt/.well-known/acme-challenge/"
<Directory "/var/lib/letsencrypt/">
AllowOverride None
Options MultiViews Indexes SymLinksIfOwnerMatch IncludesNoExec
Require method GET POST OPTIONS
</Directory>
creare secondo file raccomandato:
# nano /etc/apache2/conf-available/ssl-params.conf
ed incollare dentro:
SSLCipherSuite EECDH+AESGCM:EDH+AESGCM:AES256+EECDH:AES256+EDH
SSLProtocol All -SSLv2 -SSLv3 -TLSv1 -TLSv1.1
SSLHonorCipherOrder On
Header always set Strict-Transport-Security "max-age=63072000; includeSubDomains; preload"
Header always set X-Frame-Options DENY
Header always set X-Content-Type-Options nosniff
# Requires Apache >= 2.4
SSLCompression off
SSLUseStapling on
SSLStaplingCache "shmcb:logs/stapling-cache(150000)"
# Requires Apache >= 2.4.11
SSLSessionTickets Off
abilitare moduli e files di configurazione:
# a2enmod ssl
# a2enmod headers
# a2enmod http2
# a2enconf letsencrypt
# a2enconf ssl-params
# systemctl reload apache2
a questo punto siamo pronti ad ottenere i certificati SSL utilizzando certbot:
# certbot certonly --agree-tos --email admin@example.com --webroot -w /var/lib/letsencrypt/ -d example.com -d www.example.com
se tutto è andato bene visualizzeremo questo:
IMPORTANT NOTES:
- Congratulations! Your certificate and chain have been saved at
/etc/letsencrypt/live/example.com/fullchain.pem.
Your cert will expire on 2019-02-28. To obtain a new or tweaked
version of this certificate in the future, simply run certbot
again. To non-interactively renew *all* of your certificates, run
"certbot renew"
- If you lose your account credentials, you can recover through
e-mails sent to xxxxxxx@gmail.com.
- Your account credentials have been saved in your Certbot
configuration directory at /etc/letsencrypt. You should make a
secure backup of this folder now. This configuration directory will
also contain certificates and private keys obtained by Certbot so
making regular backups of this folder is ideal.
- If you like Certbot, please consider supporting our work by:

Donating to ISRG / Let's Encrypt: https://letsencrypt.org/donate
Donating to EFF: https://eff.org/donate-le
adesso andiamo a riconfigurare il file Virtual Host come sotto:
# nano /etc/apache2/sites-available/example.com.conf
<VirtualHost *:80>
ServerName example.com
ServerAlias www.example.com

Redirect permanent / https://example.com/
</VirtualHost>

<VirtualHost *:443>
ServerName example.com
ServerAlias www.example.com

Protocols h2 http:/1.1

<If "%{HTTP_HOST} == 'www.example.com'">
Redirect permanent / https://example.com/
</If>

DocumentRoot /var/www/example.com/public_html
ErrorLog ${APACHE_LOG_DIR}/example.com-error.log
CustomLog ${APACHE_LOG_DIR}/example.com-access.log combined

SSLEngine On
SSLCertificateFile /etc/letsencrypt/live/example.com/cert.pem
SSLCertificateKeyFile /etc/letsencrypt/live/example.com/privkey.pem
SSLCertificateChainFile /etc/letsencrypt/live/example.com/chain.pem


</VirtualHost>
# systemctl reload apache2
adesso si può fare un TEST SSL
# certbot renew --dry-run
Step 4) Installazione Owncloud
# cd /tmp
# wget https://download.owncloud.org/download/community/owncloud-latest.tar.bz2
# tar -xvf owncloud-latest.tar.bz2
# chown -R www-data:www-data owncloud
# mv owncloud /var/www/example.com/public_html/
# rm /var/www/example.com/public_html/index.html
# nano /etc/apache2/sites-available/example.com.conf
e fare puntare la DocumentRoot ad owncloud:
DocumentRoot /var/www/example.com/public_html/owncloud
Creazione database ed user mysql:
# mysql -u root -p
inserire password di root, e poi i 5 comandi sotto, e settare la password per l’utente owncloud
1) create database owncloud;
2) create user owncloud@localhost identified by 'password';
3) grant all privileges on owncloud.* to owncloud@localhost identified by 'password';
4) flush privileges;
5) exit;
# nano /etc/php/7.3/apache2/php.ini
come ultimo ritocco, aumentare la capacità di upload, andando a modificare il file .user.ini
# nano /var/www/example.com/public_html/owncloud/.user.ini
portando: upload_max_filesize, e post_max_size a 5000M
# systemctl restart apache2
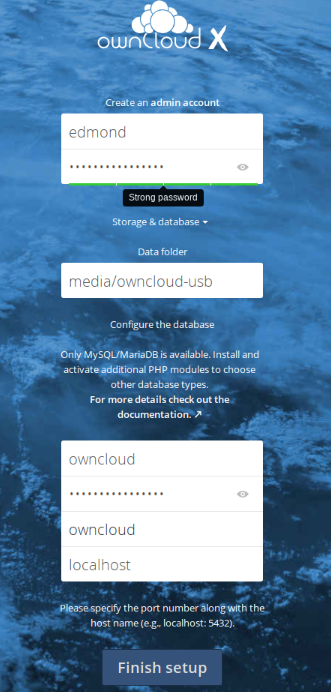
a questo punto il server owncloud è installato, ed è raggiungibile all’indirizzo https://example.com. Se si volesse utilizzare come storage un disco esterno, la guida continua:
Step 5) Creazione della cartella di storage e relativi permessi:
# mkdir /media/owncloud-usb
# groupadd www-data
# usermod -a -G www-data www-data
# chown -R www-data:www-data /media/owncloud-usb
# chmod -R 775 /media/owncloud-usb
adesso abbiamo bisogno di conoscere UUID del disco usb ed user e group di www-data, che serviranno per configurare /etc/fstab per il montaggio automatico:
# id -u www-data; id -g www-data
# blkid
# nano /etc/fstab
ed aggiungere in una sola riga qualcosa del genere in /etc/fstab:
UUID=32E49E5027A4F8A7 /media/owncloud-usb auto nofail,uid=33,gid=33,umask=0027$,dmask=0027,noatime 0 0
# reboot
Se tutto è andato bene andare all’indirizzo https://ip_dominio_del_server ed apparirà la pagina iniziale, dove si dovrà inserire nome utente e password per l’accesso al server owncloud, nome del database, user e password dell’utente owncloud, ed infine il punto di mount. Username: owncloud Password: password Database: owncloud Server: localhost
Raspberry con Owncloud Raspbian Buster Letsencrypt Apache
enjoy 


Ciao,
mi è sfuggito un particolare.
Indichi che nel file /etc/hostname va modificato il nome del dominio.
In questo file trovo la stringa “raspberry” dovrei modificarla con “example.com”.
Eventualmente posso mettere un nome diverso come “cc12.it” oppure ci sono delle regole specifiche da rispettare?
Grazie saluti
Cosa potrei aver errato?
certbot certonly –agree-tos –email admin@cc12.it –webroot -w /var/lib/letsencrypt/ -d cc12.it -d http://www.cc12.it
Saving debug log to /var/log/letsencrypt/letsencrypt.log
Plugins selected: Authenticator webroot, Installer None
Obtaining a new certificate
Performing the following challenges:
http-01 challenge for cc12.it
http-01 challenge for http://www.cc12.it
Using the webroot path /var/lib/letsencrypt for all unmatched domains.
Waiting for verification…
Cleaning up challenges
Failed authorization procedure. cc12.it (http-01): urn:ietf:params:acme:error:dns :: DNS problem: NXDOMAIN looking up A for cc12.it, http://www.cc12.it (http-01): urn:ietf:params:acme:error:dns :: DNS problem: NXDOMAIN looking up A for http://www.cc12.it
IMPORTANT NOTES:
– The following errors were reported by the server:
Domain: cc12.it
Type: None
Detail: DNS problem: NXDOMAIN looking up A for cc12.it
Domain: http://www.cc12.it
Type: None
Detail: DNS problem: NXDOMAIN looking up A for http://www.cc12.it
root@cc12:/home/pi#
Grazie in anticipo per i suggerimenti … forse è meglio se riparto da zero?
Ciao,
Dal 1 giugno 2020, letsencrypt non supporterà più ACMEv1 protocol, bensì ACMEv2 protocol, come si aggiorna certbot per essere compatibile con ACMEv2?
Un saluto