Installazione Nextcloud 27 su Raspberry pi 4

Installazione Nextcloud 27 su Raspberry pi 4

Installazione Nextcloud 27 su Raspberry pi 4


UPDATE: 14/10/23

con la versione bookworm, php8.2 è gia incluso.

Guida su come installare Nextcloud 27 su Raspberry pi 4. Per installare Nextcloud a differenza delle versioni precedenti è indispensabile avere php8.2

Nota: Assicurati di avere un Raspberry Pi 4 funzionante con Raspberry pi OS al momento bullseye.

1) Aggiornare il sistema:
$ sudo apt update
$ sudo apt upgrade -y
$ sudo reboot
2) Aggiungere i repository per ottenere le ultime versioni di php:
$ curl https://packages.sury.org/php/apt.gpg | sudo tee /usr/share/keyrings/suryphp-archive-keyring.gpg >/dev/null
$ echo "deb [signed-by=/usr/share/keyrings/suryphp-archive-keyring.gpg] https://packages.sury.org/php/ $(lsb_release -cs) main" | sudo tee /etc/apt/sources.list.d/sury-php.list
$ sudo apt update; sudo apt upgrade -y
3) Installazione di Apache2, Mysql, php8.2, certbot:
$ sudo apt install apache2 php8.2 php8.2-gd php8.2-sqlite3 php8.2-curl php8.2-zip php8.2-xml php8.2-mbstring php8.2-mysql php8.2-bz2 php8.2-intl php8.2-imap php8.2-gmp libapache2-mod-php8.2 mariadb-server python3-certbot-apache php8.2-fpm php8.2-apcu php8.2-imagick php8.2-bcmath libmagickcore-6.q16-6-extra ffmpeg redis-server php8.2-redis
4) Verifica Apache2
$ sudo a2enmod proxy_fcgi setenvif
$ sudo a2enconf php8.2-fpm
$ sudo systemctl restart apache2
$ sudo systemctl status apache2
5) Creazione utente nextcloud e db
$ sudo mysql -u root -p

ed invio

create database nextcloud_db;
create user nextclouduser@localhost identified by 'YOUR-STRONG-PWD';
grant all privileges on nextcloud_db.* to nextclouduser@localhost identified by 'YOU-STRONG-PWD';
flush privileges;
exit;
6) Download Nextcloud
$ cd /var/www/
$ sudo wget -v https://download.nextcloud.com/server/releases/latest.zip
$ sudo unzip latest.zip
$ sudo rm latest.zip

creazione  della directory di storage, quest’ultima può essere creata anche all’esterno della cartella Nextcloud o su unità esterna.

$ sudo mkdir -p /var/www/nextcloud/data
$ sudo chown -R www-data:www-data /var/www/nextcloud/
$ sudo chmod 750 /var/www/nextcloud/data
7) Configurazione Apache2
$ sudo nano /etc/apache2/sites-available/nextcloud.conf

ed incollare questa semplice configurazione, che punterà a [IPADDRESS]/nextcloud

Alias /nextcloud "/var/www/nextcloud/"

<Directory /var/www/nextcloud/>
Require all granted
AllowOverride All
Options FollowSymLinks MultiViews

<IfModule mod_dav.c>
Dav off
</IfModule>

</Directory>
$ sudo a2ensite nextcloud.conf
$ sudo systemctl reload apache2

se si volesse utilizzare invece un proprio dominio:

<VirtualHost *:80>
DocumentRoot /var/www/nextcloud/
ServerName your.domain.com

<Directory /var/www/nextcloud/>
Require all granted
AllowOverride All
Options FollowSymLinks MultiViews

<IfModule mod_dav.c>
Dav off
</IfModule>
</Directory>
</VirtualHost>
$ sudo a2ensite nextcloud.conf
$ sudo systemctl reload apache2
8) Nextcloud installazione e post installazione


Nextcloud Server su Raspberry Piandare all’indirizzo del server: [IPADDRESS]/nextcloud

$ hostname -I

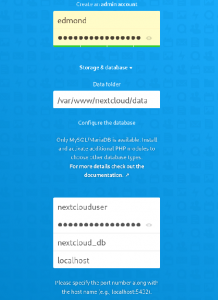
creare username e password per l’accesso via web, e poi inserire nextclouduser e nextcloud_db. I dati di default saranno in /var/www/nextcloud/data, ma si possono anche spostare successivamente.

9) Problemi accesso al server Nextcloud

se non si accede più al server andare a verificare i 2 files principali di apache2, 000-default.conf e default-ssl.conf, che puntano alla directory sbagliata:

$ sudo nano /etc/apache2/sites-available/000-default.conf
$ sudo nano /etc/apache2/sites-available/default-ssl.conf

da

DocumentRoot /var/www/html

a

DocumentRoot /var/www/
10) Tuning Apache2

alcune essenziali modifiche:

$ sudo nano /etc/php/8.2/fpm/php.ini

trovare queste tre stringhe e modificarle da così:

memory_limit = 128M
post_max_size = 8M
upload_max_filesize = 2M

a così:

memory_limit = 1024M
post_max_size = 1024M
upload_max_filesize = 1024M
$ sudo systemctl restart apache2
$ sudo systemctl restart php8.2-fpm.service

Modificare anche le porte, come sotto:

$ sudo nano /etc/apache2/ports.conf
Listen 0.0.0.0:80

<IfModule ssl_module>
Listen 0.0.0.0:443
</IfModule>

<IfModule mod_gnutls.c>
Listen 443
</IfModule>
$ sudo systemctl restart apache2
11) Certificato SSL auto-firmato

nell’esempio sotto, userò un certificato auto-firmato, ma è consigliato un certificato del tipo  Let’s Encrypt (vedi capitolo 12)

$ sudo mkdir -p /etc/apache2/ssl
£ sudo openssl req -x509 -nodes -days 365 -newkey rsa:4096 -keyout /etc/apache2/ssl/apache.key -out /etc/apache2/ssl/apache.crt
$ sudo a2enmod ssl
$ sudo systemctl restart apache2

inserire i dati per la creazione del certificato:

Country Name (2 letter code) [AU]:
State or Province Name (full name) [Some-State]:
Locality Name (eg, city) []:
Organization Name (eg, company) [Internet Widgits Pty Ltd]:
Organizational Unit Name (eg, section) []:
Common Name (e.g. server FQDN or YOUR name) []:
Email Address []:

poi trovare queste due stringhe:

$ sudo nano /etc/apache2/sites-available/default-ssl.conf

e modificarle da così:

SSLCertificateFile /etc/ssl/certs/ssl-cert-snakeoil.pem
SSLCertificateKeyFile /etc/ssl/private/ssl-cert-snakeoil.key

a così:

SSLCertificateFile /etc/apache2/ssl/apache.crt
SSLCertificateKeyFile /etc/apache2/ssl/apache.key
$ sudo a2ensite default-ssl.conf
$ sudo systemctl reload apache2
12) Installazione certificato con Let’s Encrypt
  • Il raspberry dovrà avere come dominio/hostname l’equivalente di example.com. Questo può essere modificato in /etc/hostname e poi riavviare.
  • Il vostro ip pubblico dovrà puntare quindi al dominio, nel caso non si avesse un ip pubblico, utilizzare un servizio di DNS.
  • Assicurarsi prima, di aprire la porte 80  verso il proprio server, altrimenti non si potranno ottenere i certificati. Successivamente bisognerà aprire la 443.

con certbot già installato in precedenza basta:

$ sudo certbot --webroot -w /var/www/nextcloud -i apache --agree-tos --redirect --hsts --staple-ocsp --email your@mail.com -d server.example.com

se tutto è andato bene vedremo:

IMPORTANT NOTES:
- Congratulations! Your certificate and chain have been saved at:
/etc/letsencrypt/live/example.com/fullchain.pem
Your key file has been saved at:
/etc/letsencrypt/live/example.com/privkey.pem
Your cert will expire on 2021-03-07. To obtain a new or tweaked
version of this certificate in the future, simply run certbot
again. To non-interactively renew *all* of your certificates, run
"certbot renew"
- If you like Certbot, please consider supporting our work by:

Donating to ISRG / Let's Encrypt: https://letsencrypt.org/donate
Donating to EFF: https://eff.org/donate-le

affinchè il server sia sempre raggiungibile a [IPADDRESS]/nextcloud  verificare che sia presente la stringa <Alias /nextcloud “/var/www/nextcloud/”>

$ sudo nano /etc/apache2/sites-available/nextcloud.conf

come sotto:

Alias /nextcloud "/var/www/nextcloud/"
<VirtualHost *:80>
DocumentRoot /var/www/nextcloud/
ServerName server.example.com
13) Sicurezza

13.1) Installazione e configurazione firewall ufw:

$ sudo apt install ufw
$ sudo ufw enable

bloccare tutte le connessioni in ingresso:

$ sudo ufw default allow outgoing
$ sudo ufw default deny incoming

aprire solo le porte interessate, come quella ssh o https, ad ogni modo mai utilizzare porte standard:

$ sudo ufw allow 22
$ sudo ufw allow 443/tcp
$ sudo ufw allow 80/tcp

verifica:

$ sudo ufw status verbose
$ sudo iptables -S

13.2) Installazione e configurazione fail2ban:

$ sudo apt install fail2ban
$ sudo systemctl enable fail2ban
$ sudo systemctl status fail2ban

proteggere tutti i servizi usati, utilizzando /etc/fail2ban/jail.local, fail2ban arriva già con dei filtri predefiniti che possono essere abilitati:

$ ls /etc/fail2ban/filter.d/

quindi:

$ sudo cp /etc/fail2ban/jail.conf /etc/fail2ban/jail.local
$ sudo nano /etc/fail2ban/jail.local

dove si trovano gia i filtri che si possono abilitare con “enabled = true

esempio:

[sshd]
enabled = true
port = 22
filter = sshd
logpath = /var/log/auth.log
maxretry = 3
bantime = 120
ignoreip = whitelist-IP

# detect password authentication failures
[apache]
enabled = true
port = http,https
filter = apache-auth
logpath = /var/log/apache*/*error.log
maxretry = 6

# detect potential search for exploits and php vulnerabilities
[apache-noscript]
enabled = true
port = http,https
filter = apache-noscript
logpath = /var/log/apache*/*error.log
maxretry = 6

# detect Apache overflow attempts
[apache-overflows]
enabled = true
port = http,https
filter = apache-overflows
logpath = /var/log/apache*/*error.log
maxretry = 2

# detect failures to find a home directory on a server
[apache-nohome]
enabled = true
port = http,https
filter = apache-nohome
logpath = /var/log/apache*/*error.log
maxretry = 2
$ sudo systemctl restart fail2ban 
$ sudo fail2ban-client status

13.3) Integrazione Nextcloud in fail2ban:

$ sudo nano /etc/fail2ban/filter.d/nextcloud.conf

ed inserire il codice sotto:

[Definition]
_groupsre = (?:(?:,?\s*"\w+":(?:"[^"]+"|\w+))*)
failregex = ^\{%(_groupsre)s,?\s*"remoteAddr":"<HOST>"%(_groupsre)s,?\s*"messag>
^\{%(_groupsre)s,?\s*"remoteAddr":"<HOST>"%(_groupsre)s,?\s*"messag>
datepattern = ,?\s*"time"\s*:\s*"%%Y-%%m-%%d[T ]%%H:%%M:%%S(%%z)?"

a questo punto inserire nella sezione Jail il filtro specifico per Nextcloud:

$ sudo nano /etc/fail2ban/jail.local

ed inserire:

[nextcloud]
backend = auto
enabled = true
port = 80,443
protocol = tcp
filter = nextcloud
maxretry = 3
bantime = 86400
findtime = 43200
logpath = /var/www/nextcloud/data/nextcloud.log

verifica con:

$ sudo systemctl restart fail2ban
$ sudo fail2ban-client status nextcloud

errore avvio fail2ban:

$ sudo nano /etc/fail2ban/jail.local

ed impostare:

backend = systemd
14) Trusted Domain

indicare solo gli ip ed i domini che possono accedere:

$ sudo nano /var/www/nextcloud/config/config.php
'trusted_domains' => 
array (
0 => '192.168.1.122',
1 => 'my-domain.com',
15) Abilitare Memory Caching, Redis e default phone region
$ sudo nano /var/www/nextcloud/config/config.php

ed inserire prima della voce trusted_domains

'memcache.local' => '\OC\Memcache\APCu',

poi inserire dopo la voce installed’ => true

'memcache.local' => '\OC\Memcache\APCu',
'memcache.locking' => '\OC\Memcache\Redis',
'memcache.distributed' => '\OC\Memcache\Redis',
'redis' => [
'host' => 'localhost',
'port' => 6379,
],

e a seguire:

'default_phone_region' => 'IT',
16) Background Job

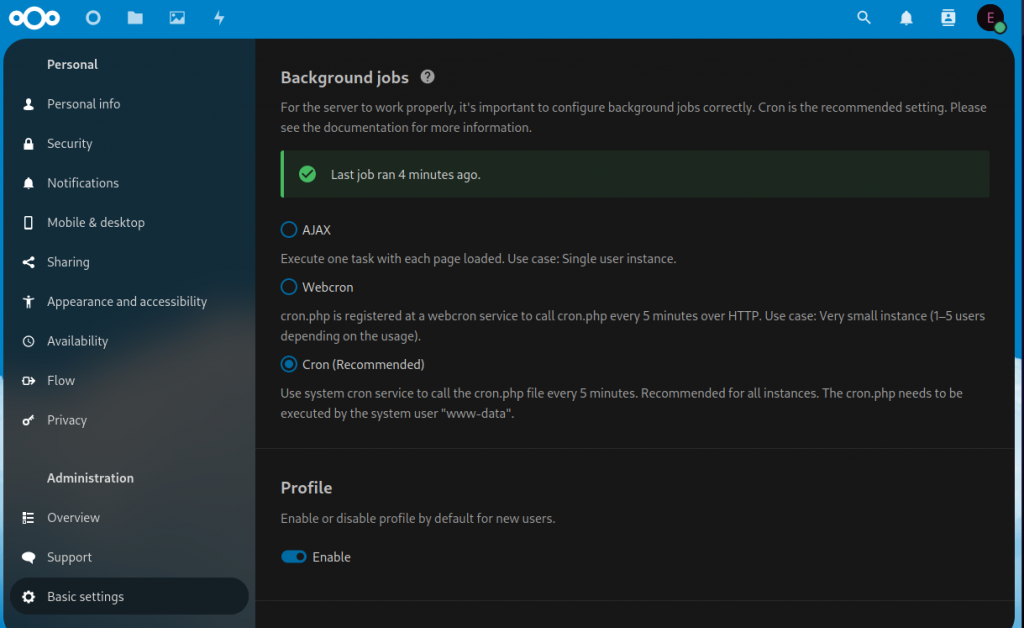
nextcloud richiede un cronjob per allegerire il carico, di default è settato in AJAX, andare nel menu Basic Settings ed impostare a cron:

Background Job

poi creare un crob job che parte in backgroung ogni 5 minuti:

$ sudo crontab -u www-data -e

ed inserire in fondo:

*/5 * * * * php8.2 --define apc.enable_cli=1 /var/www/nextcloud/cron.php

verificare con:

$ sudo crontab -u www-data -l
17) Forzare la connessione via SSL con certificato auto-firmato
$ sudo nano /etc/apache2/sites-available/000-default.conf

sostituire tutto con quello sotto, che reindirizza tutte le richieste a https:

Alias /nextcloud "/var/www/nextcloud/"

<VirtualHost *:80>
ServerAdmin admin@example

RewriteEngine On
RewriteCond %{HTTPS} off
RewriteRule ^(.*)$ https://%{HTTP_HOST}$1 [R=301,L]
</VirtualHost>
18) Aggiornamenti di sicurezza automatici giornalieri:
$ sudo apt install unattended-upgrades
$ sudo nano /etc/apt/apt.conf.d/02periodic

inserire:

APT::Periodic::Enable "1";
APT::Periodic::Update-Package-Lists "1";
APT::Periodic::Download-Upgradeable-Packages "1";
APT::Periodic::Unattended-Upgrade "1";
APT::Periodic::AutocleanInterval "1";
APT::Periodic::Verbose "2";

aggiornare:

$ sudo unattended-upgrades -d
19) Sudo DEVE sempre chiedere la password:
$ sudo nano /etc/sudoers.d/010_pi-nopasswd

diventa da così:

YOUR-USER ALL=(ALL) NOPASSWD: ALL

a così:

YOUR-USER ALL=(ALL) PASSWD: ALL
20) Mysql in sicurezza
$ sudo mysql_secure_installation
Enter current password for root (enter for none): Press Enter
Set root password? [Y/n] Y 
Remove anonymous users? [Y/n] Y 
Disallow root login remotely? [Y/n] Y 
Remove test database and access to it? [Y/n] Y 
Reload privilege tables now? [Y/n] Y
21) SSH in sicurezza

cambiare subito la porta di default e verificare che non sia abilitato il login come root, ma soprattutto usare una chiave ssh:

$ sudo nano /etc/ssh/sshd_config
#PermitRootLogin prohibit-password
Port 2223
22) Backup

backup da eseguire periodicamente su supporti esterni ed in remoto. Si può utilizzare rsync (guida), tar (guida), dd (guida), scp (guida), lsyncd (guida).

23) VPN

il sistema più sicuro per accedere da remoto è tramite vpn, se si ha un router che supporta ipSec o Wireguard (fritzbox 7590) il tutto è semplice, in alternativa si può creare un server vpn, utilizzando openvpn o wireguard


Installazione Nextcloud 27 su Raspberry pi 4

enjoy 😉


Nextcloud Server su Raspberry Pi


 Nextcloud Server su Raspberry Pi

Nextcloud Server su Raspberry Pi


Guida su come installare un server, utilizzando Nextcloud su Raspberry Pi 3/4. A differenza della guida precedente, dove ho utilizzato Nginx come web server, adesso utilizzerò Apache2.  Ci saranno anche 10 consigli per rendere più sicuro il server.

Prerequisiti ed info
  • Raspberry Pi 3/4
  • Raspberry Pi OS Bullseye già installato con accesso ssh.
  • Consiglio di utilizzare rpi-imager per preparare la sd card, e nelle impostazioni abilitare subito ssh, e sopratutto creare un nuovo utente.
  • La guida è stata testata su una installazione pulita di Raspberry Pi OS Lite.
1) Accedere al Raspberry via ssh ed aggiornare
sudo apt update; sudo apt upgrade -y
sudo reboot
2) Installazione php8.0 Mariadb Apache2
sudo apt install apache2 php8.0 php8.0-gd php8.0-sqlite3 php8.0-curl php8.0-zip php8.0-xml php8.0-mbstring php8.0-mysql php8.0-bz2 php8.0-intl php-smbclient php8.0-imap php8.0-gmp libapache2-mod-php8.0 mariadb-server python3-certbot-apache
3) Verifica Apache2
sudo systemctl restart apache2
sudo systemctl status apache2
4) Creazione utente nextcloud e db
sudo mysql -u root -p

ed invio

create database nextcloud_db;
create user nextclouduser@localhost identified by 'YOUR-STRONG-PWD';
grant all privileges on nextcloud_db.* to nextclouduser@localhost identified by 'YOU-STRONG-PWD';
flush privileges;
exit
5) Download Nextcloud
cd /var/www/
sudo wget -v https://download.nextcloud.com/server/releases/latest.zip
sudo unzip latest.zip
sudo rm latest.zip

creazione  della directory di storage, quest’ultima può essere creata anche all’esterno della cartella Nextcloud o su unità esterna.

sudo mkdir -p /var/www/nextcloud/data
sudo chown -R www-data:www-data /var/www/nextcloud/
sudo chmod 750 /var/www/nextcloud/data
6) Configurazione Apache2
sudo nano /etc/apache2/sites-available/nextcloud.conf

ed incollare questa semplice configurazione, che punterà a http://ip-server/nextcloud/

<Directory /var/www/nextcloud/>
Require all granted
AllowOverride All
Options FollowSymLinks MultiViews

<IfModule mod_dav.c>
Dav off
</IfModule>

</Directory>
sudo a2ensite nextcloud.conf
sudo systemctl reload apache2

se si volesse utilizzare invece un proprio dominio:

<VirtualHost *:80>
DocumentRoot /var/www/nextcloud/
ServerName your.domain.com

<Directory /var/www/nextcloud/>
Require all granted
AllowOverride All
Options FollowSymLinks MultiViews

<IfModule mod_dav.c>
Dav off
</IfModule>
</Directory>
</VirtualHost>
sudo a2ensite nextcloud.conf
sudo systemctl reload apache2
7) Nextcloud post installazione


Nextcloud Server su Raspberry Piandare all’indirizzo del server: http://my-ip-address/nextcloud/

# hostname -I

creare username e password per l’accesso via web, e poi inserire nextclouduser e nextclouddb. I dati di default saranno in /var/www/nextcloud/data, ma si possono anche spostare successivamente.

8) Tuning Apache2

alcune essenziali modifiche:

sudo nano /etc/php/8.0/apache2/php.ini

trovare queste tre stringhe e modificarle da così:

memory_limit = 128M
post_max_size = 8M
upload_max_filesize = 2M

a così:

memory_limit = 512M
post_max_size = 1024M
upload_max_filesize = 1024M
sudo systemctl restart apache2
9) Certificato SSL

nell’esempio sotto, userò un auto-certificato, ma è consigliato un certificato del tipo Let’s Encrypt, come mostrato nella guida precedente.

sudo mkdir -p /etc/apache2/ssl
sudo openssl req -x509 -nodes -days 365 -newkey rsa:4096 -keyout /etc/apache2/ssl/apache.key -out /etc/apache2/ssl/apache.crt
sudo a2enmod ssl
sudo systemctl restart apache2

trovare queste due stringhe:

sudo nano /etc/apache2/sites-available/default-ssl.conf

e modificarle da così:

SSLCertificateFile /etc/ssl/certs/ssl-cert-snakeoil.pem
SSLCertificateKeyFile /etc/ssl/private/ssl-cert-snakeoil.key

a così:

SSLCertificateFile /etc/apache2/ssl/apache.crt
SSLCertificateKeyFile /etc/apache2/ssl/apache.key
sudo a2ensite default-ssl.conf
sudo systemctl reload apache2
10) Sicurezza

10.1) Installazione e configurazione firewall ufw:

sudo apt install ufw
sudo ufw enable

bloccare tutte le connessioni in ingresso:

sudo ufw default allow outgoing
sudo ufw default deny incoming

aprire solo le porte interessate, come quella ssh o https, ad ogni modo mai utilizzare porte standard:

sudo ufw allow 22
sudo ufw allow 443/tcp

verifica:

sudo ufw status verbose
sudo iptables -S

10.2) Installazione e configurazione fail2ban:

sudo apt install fail2ban
sudo systemctl enable fail2ban
sudo systemctl start fail2ban

proteggere tutti i servizi usati, utilizzando /etc/fail2ban/jail.local, fail2ban arriva già con dei filtri predefiniti che possono essere abilitati:

ls /etc/fail2ban/filter.d/

esempio:

[sshd]
enabled = true
port = 22
filter = sshd
logpath = /var/log/auth.log
maxretry = 3
bantime = 120
ignoreip = whitelist-IP

# detect password authentication failures
[apache]
enabled = true
port = http,https
filter = apache-auth
logpath = /var/log/apache*/*error.log
maxretry = 6

# detect potential search for exploits and php vulnerabilities
[apache-noscript]
enabled = true
port = http,https
filter = apache-noscript
logpath = /var/log/apache*/*error.log
maxretry = 6

# detect Apache overflow attempts
[apache-overflows]
enabled = true
port = http,https
filter = apache-overflows
logpath = /var/log/apache*/*error.log
maxretry = 2

# detect failures to find a home directory on a server
[apache-nohome]
enabled = true
port = http,https
filter = apache-nohome
logpath = /var/log/apache*/*error.log
maxretry = 2
sudo systemctl restart fail2ban 
sudo fail2ban-client status

10.3) Trusted Domain

indicare solo gli ip ed i domini che possono accedere:

sudo nano /var/www/nextcloud/config/config.php
'trusted_domains' => 
array (
0 => '192.168.1.122',
1 => 'my-domain.com',

10.4) Forzare la connessione via SSL

sudo nano /etc/apache2/sites-available/000-default.conf

sostituire http con https:

<VirtualHost *:80>
ServerAdmin admin@example

RewriteEngine On
RewriteCond %{HTTPS} off
RewriteRule ^(.*)$ https://%{HTTP_HOST}$1 [R=301,L]
</VirtualHost>

10.5) Aggiornamenti di sicurezza automatici giornalieri:

sudo apt install unattended-upgrades
sudo nano /etc/apt/apt.conf.d/02periodic

inserire:

APT::Periodic::Enable "1";
APT::Periodic::Update-Package-Lists "1";
APT::Periodic::Download-Upgradeable-Packages "1";
APT::Periodic::Unattended-Upgrade "1";
APT::Periodic::AutocleanInterval "1";
APT::Periodic::Verbose "2";

aggiornare:

sudo unattended-upgrades -d

10.6) Sudo DEVE sempre chiedere la password:

sudo nano /etc/sudoers.d/010_pi-nopasswd

diventa da così:

YOUR-USER ALL=(ALL) NOPASSWD: ALL

a così:

YOUR-USER ALL=(ALL) PASSWD: ALL

10.7) Mysql in sicurezza

sudo mysql_secure_installation
Enter current password for root (enter for none): Press Enter
Set root password? [Y/n] Y 
Remove anonymous users? [Y/n] Y 
Disallow root login remotely? [Y/n] Y 
Remove test database and access to it? [Y/n] Y 
Reload privilege tables now? [Y/n] Y

10.8) SSH in sicurezza

cambiare subito la porta di default e verificare che non sia abilitato il login come root, ma soprattutto usare una chiave ssh:

sudo nano /etc/ssh/sshd_config
#PermitRootLogin prohibit-password
Port 2223
10.9) Backup

backup da eseguire periodicamente su supporti esterni ed in remoto. Si può utilizzare rsync (guida), tar (guida), dd (guida), scp (guida), lsyncd (guida).

10.10) VPN

il sistema più sicuro per accedere da remoto è tramite vpn, se si ha un router che supporta ipSec o Wireguard (fritzbox 7590) il tutto è semplice, in alternativa si può creare un server vpn, utilizzando openvpn o wireguard

Nextcloud Server su Raspberry Pi

enjoy 😉

(Solved) Certbot error could not bind to IPv4

(Solved) Certbot error could not bind to IPv4


Su un mio server ho avuto un problema con il rinnovo del certificato Let’s Encrypt, tramite certbot. L’errore è il seguente:

Attempting to renew cert (mio_server.com) from /etc/letsencrypt/renewal/mio_server.com.conf produced an unexpected error: Problem binding to port 80: Could not bind to IPv4 or IPv6.. Skipping.
All renewal attempts failed. The following certs could not be renewed:
/etc/letsencrypt/live/mio_server.com/fullchain.pem (failure)

come si evince da questo tipo di errore, il tutto mi ha portato a verificare le regole di nat, non trovando però nulla di anomalo. Per aggiornare manualmente Lets’Encrypt, i passi che mi ricordo di avere sempre fatto, sono i seguenti:

# systemctl stop nginx
# certbot renew --dry-run #(come test)

quindi:

# certbot renew

ma l’errore era sempre lo stesso, quindi sono andato a verificare quale programma andava ad utilizzare la porta 80:

# sudo ss -tlpn | grep -E ":(80|443)"

e con mia sorpresa ho notato che nginx, che io avevo stoppato, la utilizzava ancora:

LISTEN 0 511 0.0.0.0:8080 0.0.0.0:* users:(("nginx",pid=21906,fd=12),("nginx",pid=21905,fd=12),("nginx",pid=21904,fd=12),("nginx",pid=21903,fd=12),("nginx",pid=21902,fd=12))
LISTEN 0 511 0.0.0.0:80 0.0.0.0:* users:(("nginx",pid=21906,fd=8),("nginx",pid=21905,fd=8),("nginx",pid=21904,fd=8),("nginx",pid=21903,fd=8),("nginx",pid=21902,fd=8))
LISTEN 0 511 [::]:8001 [::]:* users:(("nginx",pid=21906,fd=9),("nginx",pid=21905,fd=9),("nginx",pid=21904,fd=9),("nginx",pid=21903,fd=9),("nginx",pid=21902,fd=9))

non so per quale motivo e nemmeno ho indagato a fondo, ma dopo aver stoppato nginx, se davo 2 comandi “certbot” di seguito, automaticamente nginx ripartiva automaticamente. Quindi per risolvere basta:

# systemctl stop nginx
# certbot renew
# systemctl start nginx
(Solved) Certbot error could not bind to IPv4

enjoy 😉


Nextcloud Letsencrypt su Raspberry Pi 4

Nextcloud Letsencrypt su Raspberry Pi 4

Nextcloud Letsencrypt su Raspberry Pi 4

Guida su come installare Nextcloud con Letsencrypt su Raspberry Pi 4, utilizzando Raspberry Pi OS Buster. A differenza della guida precedente, dove utilizzavo Owncloud ed apache2 come web server, adesso utilizzerò Nextcloud ed nginx.

Prerequisiti ed info
  • Raspberry Pi 4/3
  • Raspberry Pi OS Buster già installato ed accesso ssh
  • Il raspberry dovrà avere come dominio/hostname l’equivalente di example.com. Questo può essere modificato in /etc/hostname e poi riavviare.
  • Il vostro ip pubblico dovrà puntare quindi al dominio, nel caso non si avesse un ip pubblico, utilizzare un servizio di DNS.
  • Assicurarsi prima, di aprire la porte 80  verso il proprio server, altrimenti non si potranno ottenere i certificati. Successivamente bisognerà aprire la 8443.
  • La guida è stata testata su una installazione pulita di Raspberry Pi OS Lite.
1) Accedere al Raspberry via ssh ed Installazione Nginx web server:
$ sudo su
$ su -
# apt install nginx -y
# systemctl start nginx
# systemctl enable nginx

verifica nginx:

# systemctl status nginx
2) Installazione php7.3
# apt install -y php7.3-gd php7.3-json php7.3-mysql php7.3-curl php7.3-intl php-imagick php7.3-zip php7.3-xml php7.3-mbstring php7.3-fpm php7.3-mysql php7.3-bz2 php7.3-bcmath php7.3-gmp

modifica di 2 php.ini

# nano /etc/php/7.3/fpm/php.ini
# nano /etc/php/7.3/cli/php.ini

in entrambi i files andiamo a decommentare e ad aggiornare:

date.timezone = Europe/Rome

salavare ed uscire e passare alla modifica di www.cond

# nano /etc/php/7.3/fpm/pool.d/www.conf

e decommentare le righe come sotto:

env[HOSTNAME] = $HOSTNAME
env[PATH] = /usr/local/bin:/usr/bin:/bin
env[TMP] = /tmp
env[TMPDIR] = /tmp
env[TEMP] = /tmp
# systemctl restart php7.3-fpm
# systemctl enable php7.3-fpm
3) Installazione e configurazione MariaDB Server
# apt install mariadb-server -y

settare password root MariaDB

# mysql_secure_installation
Enter current password for root (enter for none): Press Enter
Set root password? [Y/n] Y 
Remove anonymous users? [Y/n] Y 
Disallow root login remotely? [Y/n] Y 
Remove test database and access to it? [Y/n] Y 
Reload privilege tables now? [Y/n] Y

creazione user e db per nextcloud:

# mysql -u root -p

inserire password e poi i 5 comandi sotto:

create database nextcloud_db;
create user nextclouduser@localhost identified by 'IN_PASSWORD';
grant all privileges on nextcloud_db.* to nextclouduser@localhost identified by 'IN_PASSWORD';
flush privileges;
exit
4) Certificato SSL Letsencrypt
# apt install certbot -y
# systemctl stop nginx
# certbot certonly --standalone -d example.com

se è andato tutto bene si otterrà:

IMPORTANT NOTES:
- Congratulations! Your certificate and chain have been saved at:
/etc/letsencrypt/live/example.com/fullchain.pem
Your key file has been saved at:
/etc/letsencrypt/live/example.com/privkey.pem
Your cert will expire on 2021-03-07. To obtain a new or tweaked
version of this certificate in the future, simply run certbot
again. To non-interactively renew *all* of your certificates, run
"certbot renew"
- If you like Certbot, please consider supporting our work by:

Donating to ISRG / Let's Encrypt: https://letsencrypt.org/donate
Donating to EFF: https://eff.org/donate-le
5) Download Nextcloud
# apt install wget unzip zip -y
# cd /var/www/
# wget -q https://download.nextcloud.com/server/releases/latest.zip
# unzip latest.zip
# chown -R www-data:www-data /var/www/nextcloud
6) Configurazione Virtual Host
# nano /etc/nginx/sites-available/nextcloud

ed incollare dentro, con le rispettive modifiche:

upstream php-handler {
#server 127.0.0.1:9000;
server unix:/var/run/php/php7.3-fpm.sock;
}

server {
listen 80;
listen [::]:80;
server_name example.com;
# enforce https
return 301 https://$server_name:8443$request_uri;
}

server {
listen 8443 ssl http2;
listen [::]:8443 ssl http2;
server_name example.com;

# Use Mozilla's guidelines for SSL/TLS settings
# https://mozilla.github.io/server-side-tls/ssl-config-generator/
# NOTE: some settings below might be redundant
ssl_certificate /etc/letsencrypt/live/example.com/fullchain.pem;
ssl_certificate_key /etc/letsencrypt/live/example.com/privkey.pem;

# Add headers to serve security related headers
# Before enabling Strict-Transport-Security headers please read into this
# topic first.
#add_header Strict-Transport-Security "max-age=15768000; includeSubDomains; preload;" always;
#
# WARNING: Only add the preload option once you read about
# the consequences in https://hstspreload.org/. This option
# will add the domain to a hardcoded list that is shipped
# in all major browsers and getting removed from this list
# could take several months.
add_header Referrer-Policy "no-referrer" always;
add_header X-Content-Type-Options "nosniff" always;
add_header X-Download-Options "noopen" always;
add_header X-Frame-Options "SAMEORIGIN" always;
add_header X-Permitted-Cross-Domain-Policies "none" always;
add_header X-Robots-Tag "none" always;
add_header X-XSS-Protection "1; mode=block" always;

# Remove X-Powered-By, which is an information leak
fastcgi_hide_header X-Powered-By;

# Path to the root of your installation
root /var/www/nextcloud;

location = /robots.txt {
allow all;
log_not_found off;
access_log off;
}

# The following 2 rules are only needed for the user_webfinger app.
# Uncomment it if you're planning to use this app.
#rewrite ^/.well-known/host-meta /public.php?service=host-meta last;
#rewrite ^/.well-known/host-meta.json /public.php?service=host-meta-json last;

# The following rule is only needed for the Social app.
# Uncomment it if you're planning to use this app.
#rewrite ^/.well-known/webfinger /public.php?service=webfinger last;

location = /.well-known/carddav {
return 301 $scheme://$host:$server_port/remote.php/dav;
}
location = /.well-known/caldav {
return 301 $scheme://$host:$server_port/remote.php/dav;
}

# set max upload size
client_max_body_size 512M;
fastcgi_buffers 64 4K;

# Enable gzip but do not remove ETag headers
gzip on;
gzip_vary on;
gzip_comp_level 4;
gzip_min_length 256;
gzip_proxied expired no-cache no-store private no_last_modified no_etag auth;
gzip_types application/atom+xml application/javascript application/json application/ld+json application/manifest+json application/rss+xml application/vnd.geo+json application/vnd.ms-fontobject application/x-font-ttf application/x-web-app-manifest+json application/xhtml+xml application/xml font/opentype image/bmp image/svg+xml image/x-icon text/cache-manifest text/css text/plain text/vcard text/vnd.rim.location.xloc text/vtt text/x-component text/x-cross-domain-policy;

# Uncomment if your server is build with the ngx_pagespeed module
# This module is currently not supported.
#pagespeed off;

location / {
rewrite ^ /index.php;
}

location ~ ^\/(?:build|tests|config|lib|3rdparty|templates|data)\/ {
deny all;
}
location ~ ^\/(?:\.|autotest|occ|issue|indie|db_|console) {
deny all;
}

location ~ ^\/(?:index|remote|public|cron|core\/ajax\/update|status|ocs\/v[12]|updater\/.+|oc[ms]-provider\/.+)\.php(?:$|\/) {
fastcgi_split_path_info ^(.+?\.php)(\/.*|)$;
set $path_info $fastcgi_path_info;
try_files $fastcgi_script_name =404;
include fastcgi_params;
fastcgi_param SCRIPT_FILENAME $document_root$fastcgi_script_name;
fastcgi_param PATH_INFO $path_info;
fastcgi_param HTTPS on;
# Avoid sending the security headers twice
fastcgi_param modHeadersAvailable true;
# Enable pretty urls
fastcgi_param front_controller_active true;
fastcgi_pass php-handler;
fastcgi_intercept_errors on;
fastcgi_request_buffering off;
}

location ~ ^\/(?:updater|oc[ms]-provider)(?:$|\/) {
try_files $uri/ =404;
index index.php;
}

# Adding the cache control header for js, css and map files
# Make sure it is BELOW the PHP block
location ~ \.(?:css|js|woff2?|svg|gif|map)$ {
try_files $uri /index.php$request_uri;
add_header Cache-Control "public, max-age=15778463";
# Add headers to serve security related headers (It is intended to
# have those duplicated to the ones above)
# Before enabling Strict-Transport-Security headers please read into
# this topic first.
#add_header Strict-Transport-Security "max-age=15768000; includeSubDomains; preload;" always;
#
# WARNING: Only add the preload option once you read about
# the consequences in https://hstspreload.org/. This option
# will add the domain to a hardcoded list that is shipped
# in all major browsers and getting removed from this list
# could take several months.
add_header Referrer-Policy "no-referrer" always;
add_header X-Content-Type-Options "nosniff" always;
add_header X-Download-Options "noopen" always;
add_header X-Frame-Options "SAMEORIGIN" always;
add_header X-Permitted-Cross-Domain-Policies "none" always;
add_header X-Robots-Tag "none" always;
add_header X-XSS-Protection "1; mode=block" always;

# Optional: Don't log access to assets
access_log off;
}

location ~ \.(?:png|html|ttf|ico|jpg|jpeg|bcmap)$ {
try_files $uri /index.php$request_uri;
# Optional: Don't log access to other assets
access_log off;
}
}

salvare ed uscire. Poi fare un paio di modifiche:

# ln -s /etc/nginx/sites-available/nextcloud /etc/nginx/sites-enabled/
# nano /etc/nginx/nginx.conf

e decommentare la linea sotto:

server_names_hash_bucket_size 64;

fare un test di nginx:

# nginx -t

se non ci sono errori avremo un output come sotto:

root@example:/var/www# nginx -t
nginx: the configuration file /etc/nginx/nginx.conf syntax is ok
nginx: configuration file /etc/nginx/nginx.conf test is successful
# systemctl restart nginx
# systemctl restart php7.3-fpm
7) Nextcloud post installazione

Nextcloud Letsencrypt su Raspberry Pi 4 andare all’indirizzo del server:

# hostname -I

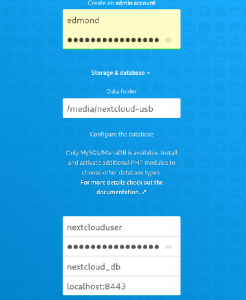
creare username e password per l’accesso via web, e poi inserire nextclouduser e nextcloud_db. Nel caso di porta diversa della 443, è meglio inserirla come in figura sopra. I dati di default saranno in /var/www/nextcloud/data. Ma conviene sempre tenerli all’esterno della sd-card. Esempio con usb esterna.

8) Creazione della cartella di storage e relativi permessi:
# mkdir /media/nextcloud-usb
# groupadd www-data
# usermod -a -G www-data www-data
# chown -R www-data:www-data /media/nextcloud-usb
# chmod -R 775 /media/nextcloud-usb

adesso abbiamo bisogno di conoscere UUID del disco usb e configurare /etc/fstab per il montaggio automatico:

# blkid
# nano /etc/fstab

ed aggiungere qualcosa del genere in /etc/fstab:

UUID=f9kjhg70-0784-4eaa-9cc5-4ctrewc62275 /media/nextcloud-usb ext4 defaults 0
# reboot

al riavvio verificare se la usb esterna è stata montata correttamente:

$ df -h

Questa guida consente di avere un server cloud personale, ma bisogna ricordarsi che bisognerà proteggerlo, e quindi integrare delle robuste policy di sicurezza, come fail2ban, iptables, ufw, ecc ecc.

Nextcloud Letsencrypt su Raspberry Pi 4

enjoy 😉

Raspberry con Owncloud Raspbian Buster Letsencrypt Apache

Raspberry con Owncloud Raspbian Buster Letsencrypt ApacheRaspberry con Owncloud Raspbian Buster Letsencrypt Apache

Guida su come realizzare un proprio server cloud, utilizzando owncloud, su raspberry pi 3/4, con Raspbian Buster, ma in alternativa si puo utilizzare un’altro modello di single board o Pc, con OS Debian based. Avevo gia fatto una guida precedentemente, utilizzando Raspbian Stretch. Inoltre utilizzando Let’s Encrypt si avranno certificati SSL gratuiti tramite un processo completamente automatizzato, progettato per eliminare la creazione manuale di certificati, per la convalida, l’installazione e il rinnovo. I certificati rilasciati da Let’s Encrypt sono validi per 90 giorni dalla data di emissione e sono oggi considerati affidabili da tutti i principali browser.

Prerequisiti ed info

  • Negli esempi sotto utilizzerò come nome di dominio example.com ed i comandi verranno eseguiti da root
  • Il raspberry dovrà avere quindi come dominio l’equivalente di example.com. Questo può essere modificato in /etc/hostname e poi riavviare.
  • Il vostro ip pubblico dovrà puntare quindi al dominio, nel caso non si avesse un ip pubblico, utilizzare un servizio di DNS.
  • Assicurarsi prima di aprire le porte 80/443 verso il proprio server, altrimenti non si potranno ottenere i certificati. Successivamente rimarrà aperta solo la 443.
  • La guida è stata testata su una installazione pulita di Raspbian Buster

Raspberry con Owncloud Raspbian Buster Letsencrypt Apache

Step 1) Installare i pacchetti necessari:

$ sudo su
# apt update; apt upgrade
# apt install apache2 mariadb-server libapache2-mod-php7.3 php7.3-gd php7.3-json php7.3-mysql php7.3-curl php7.3-intl php-imagick php7.3-zip php7.3-xml php7.3-mbstring ntfs-3g fail2ban certbot

Step 2) Configurazione Apache e Virtual Host basic

# rm -rf /var/www/html/
# mkdir -p /var/www/example.com/public_html
# nano /var/www/example.com/public_html/index.html

ed incollare dentro:

<!DOCTYPE html>
<html lang="en" dir="ltr">
<head>
<meta charset="utf-8">
<title>Welcome to example.com</title>
</head>
<body>
<h1>Success! example.com home page!</h1>
</body>
</html
# nano /etc/apache2/sites-available/example.com.conf

ed incollare dentro:

<VirtualHost *:80>
ServerName example.com
ServerAlias www.example.com
ServerAdmin webmaster@example.com
DocumentRoot /var/www/example.com/public_html

<Directory /var/www/example.com/public_html>
Options -Indexes +FollowSymLinks
AllowOverride All
</Directory>

ErrorLog ${APACHE_LOG_DIR}/example.com-error.log
CustomLog ${APACHE_LOG_DIR}/example.com-access.log combined
</VirtualHost>

poi:

# chown -R www-data: /var/www/example.com/
# mv /etc/apache2/sites-available/000-default.conf 000-default.conf.bak
# mv /etc/apache2/sites-enabled/000-default.conf 000-default.conf.bak
# a2ensite example.com
# systemctl restart apache2
# systemctl enable apache2

a questo punto collegandosi al server dovremmo vedere che funziona:

Raspberry con Owncloud Letsencrypt ApacheStep 3) Chiave e Letsencrypt

Creare una chiave robusta Dh (Diffie-Hellman) a 1024 oppure a 2048 bit, ci vorrà circa 20 minuti.

# openssl dhparam -out /etc/ssl/certs/dhparam.pem 1024

Per ottenere i certificati utilizzeremo certbot, installato precedentemente, che si occuperà dell’acquisizione e del rinnovo degli stessi. Utilizzeremo il plug-in Webroot che funziona creando un file temporaneo nella ${webroot-path}/.well-known/acme-challenge a cui si collegherà Letsencrypt per risolvere il DNS:

# mkdir -p /var/lib/letsencrypt/.well-known
# chgrp www-data /var/lib/letsencrypt
# chmod g+s /var/lib/letsencrypt

creare primo file di configurazione:

# nano /etc/apache2/conf-available/letsencrypt.conf

ed incollare dentro:

Alias /.well-known/acme-challenge/ "/var/lib/letsencrypt/.well-known/acme-challenge/"
<Directory "/var/lib/letsencrypt/">
AllowOverride None
Options MultiViews Indexes SymLinksIfOwnerMatch IncludesNoExec
Require method GET POST OPTIONS
</Directory>

creare secondo file raccomandato:

# nano /etc/apache2/conf-available/ssl-params.conf

ed incollare dentro:

SSLCipherSuite EECDH+AESGCM:EDH+AESGCM:AES256+EECDH:AES256+EDH
SSLProtocol All -SSLv2 -SSLv3 -TLSv1 -TLSv1.1
SSLHonorCipherOrder On
Header always set Strict-Transport-Security "max-age=63072000; includeSubDomains; preload"
Header always set X-Frame-Options DENY
Header always set X-Content-Type-Options nosniff
# Requires Apache >= 2.4
SSLCompression off
SSLUseStapling on
SSLStaplingCache "shmcb:logs/stapling-cache(150000)"
# Requires Apache >= 2.4.11
SSLSessionTickets Off

abilitare moduli e files di configurazione:

# a2enmod ssl
# a2enmod headers
# a2enmod http2
# a2enconf letsencrypt
# a2enconf ssl-params
# systemctl reload apache2

a questo punto siamo pronti ad ottenere i certificati SSL utilizzando certbot:

# certbot certonly --agree-tos --email admin@example.com --webroot -w /var/lib/letsencrypt/ -d example.com -d www.example.com

se tutto è andato bene visualizzeremo questo:

IMPORTANT NOTES:
- Congratulations! Your certificate and chain have been saved at
/etc/letsencrypt/live/example.com/fullchain.pem.
Your cert will expire on 2019-02-28. To obtain a new or tweaked
version of this certificate in the future, simply run certbot
again. To non-interactively renew *all* of your certificates, run
"certbot renew"
- If you lose your account credentials, you can recover through
e-mails sent to xxxxxxx@gmail.com.
- Your account credentials have been saved in your Certbot
configuration directory at /etc/letsencrypt. You should make a
secure backup of this folder now. This configuration directory will
also contain certificates and private keys obtained by Certbot so
making regular backups of this folder is ideal.
- If you like Certbot, please consider supporting our work by:

Donating to ISRG / Let's Encrypt: https://letsencrypt.org/donate
Donating to EFF: https://eff.org/donate-le

adesso andiamo a riconfigurare il file Virtual Host come sotto:

# nano /etc/apache2/sites-available/example.com.conf
ed incollare dentro:
<VirtualHost *:80> 
ServerName example.com
ServerAlias www.example.com

Redirect permanent / https://example.com/
</VirtualHost>

<VirtualHost *:443>
ServerName example.com
ServerAlias www.example.com

Protocols h2 http:/1.1

<If "%{HTTP_HOST} == 'www.example.com'">
Redirect permanent / https://example.com/
</If>

DocumentRoot /var/www/example.com/public_html
ErrorLog ${APACHE_LOG_DIR}/example.com-error.log
CustomLog ${APACHE_LOG_DIR}/example.com-access.log combined

SSLEngine On
SSLCertificateFile /etc/letsencrypt/live/example.com/cert.pem
SSLCertificateKeyFile /etc/letsencrypt/live/example.com/privkey.pem
SSLCertificateChainFile /etc/letsencrypt/live/example.com/chain.pem


</VirtualHost>
ricaricare la nuova configurazione:
# systemctl reload apache2

adesso si può fare un TEST SSL

Rinnovo automatico dei certificati: Come dicevo all’inizio, i certificati di Let’s Encrypt hanno una durata di 90 giorni, dopodichè dovrebbero autorinnovarsi traminte un cronjob, altrimenti aggiornare manualmente con il comando:
# certbot renew --dry-run

Step 4) Installazione Owncloud

# cd /tmp
# wget https://download.owncloud.org/download/community/owncloud-latest.tar.bz2
# tar -xvf owncloud-latest.tar.bz2
# chown -R www-data:www-data owncloud
# mv owncloud /var/www/example.com/public_html/
# rm /var/www/example.com/public_html/index.html
# nano /etc/apache2/sites-available/example.com.conf

e fare puntare la DocumentRoot ad owncloud:

DocumentRoot /var/www/example.com/public_html/owncloud

Creazione database ed user mysql:

# mysql -u root -p

inserire password di root, e poi i 5 comandi sotto, e settare la password per l’utente owncloud

1) create database owncloud;
2) create user owncloud@localhost identified by 'password';
3) grant all privileges on owncloud.* to owncloud@localhost identified by 'password';
4) flush privileges;
5) exit;
fare una modifica al file php.ini, nella sezione File Uploads, portando upload_max_filesize = 5000M.
# nano /etc/php/7.3/apache2/php.ini

come ultimo ritocco, aumentare la capacità di upload, andando a modificare il file .user.ini

# nano /var/www/example.com/public_html/owncloud/.user.ini

portando: upload_max_filesize, e post_max_size a 5000M

# systemctl restart apache2

a questo punto il server owncloud è installato, ed è raggiungibile all’indirizzo https://example.com. Se si volesse utilizzare come storage un disco esterno, la guida continua:

Step 5) Creazione della cartella di storage e relativi permessi:

# mkdir /media/owncloud-usb
# groupadd www-data
# usermod -a -G www-data www-data
# chown -R www-data:www-data /media/owncloud-usb
# chmod -R 775 /media/owncloud-usb

adesso abbiamo bisogno di conoscere UUID del disco usb ed user e group di www-data, che serviranno per configurare /etc/fstab per il montaggio automatico:

# id -u www-data; id -g www-data
# blkid
# nano /etc/fstab

ed aggiungere in una sola riga qualcosa del genere in /etc/fstab:

UUID=32E49E5027A4F8A7 /media/owncloud-usb auto nofail,uid=33,gid=33,umask=0027$,dmask=0027,noatime 0 0
# reboot

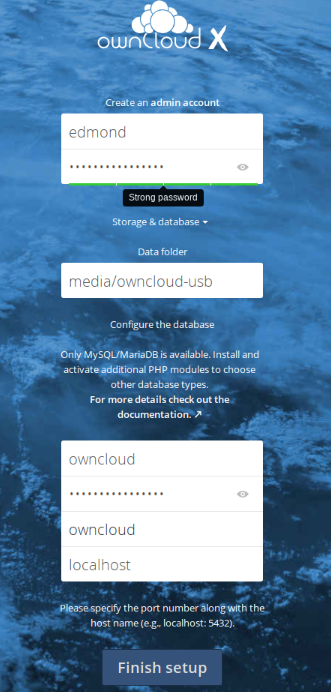
Se tutto è andato bene andare all’indirizzo https://ip_dominio_del_server ed apparirà la pagina iniziale, dove si dovrà inserire nome utente e password per l’accesso al server owncloud, nome del database, user e password dell’utente owncloud, ed infine il punto di mount. Username: owncloud Password: password Database: owncloud Server: localhost

Raspberry con Owncloud Letsencrypt Apache

Raspberry con Owncloud Raspbian Buster Letsencrypt Apache

enjoy ?

Raspberry con Owncloud Letsencrypt Apache

Raspberry con Owncloud Letsencrypt Apache

L’obiettivo di questa guida è quello di realizzare un proprio server owncloud, e nello specifico io utilizzerò un raspberry pi 3 , ma in alternativa si potrà utilizzare un’altro modello di single board o Pc, con OS Debian based. Avevo gia fatto una guida precedentemente, ma in quell’occasione avevo utilizzato un certificato auto firmato, che chiaramente i browser vedono come non sicuro. In questo caso invece utilizzerò Let’s Encrypt che fornisce certificati SSL gratuiti tramite un processo completamente automatizzato, progettato per eliminare la creazione manuale di certificati, per la convalida, l’installazione e il rinnovo. I certificati rilasciati da Let’s Encrypt sono validi per 90 giorni dalla data di emissione e sono oggi considerati affidabili da tutti i principali browser.

Prerequisiti ed info

  • Negli esempi sotto utilizzerò come nome di dominio example.com ed i comandi verranno eseguiti da root
  • Il raspberry dovrà avere quindi come dominio l’equivalente di example.com. Questo può essere modificato in /etc/hostname e poi riavviare.
  • Il vostro ip pubblico dovrà puntare quindi al dominio, nel caso non si avesse un ip pubblico, utilizzare un servizio di DNS.
  • Assicurarsi prima di aprire le porte 80/443 verso il proprio server, altrimenti non si potranno ottenere i certificati. Successivamente rimarrà aperta solo la 443.
  • La guida è stata testata su una installazione pulita di Raspbian Stretch
Raspberry con Owncloud Letsencrypt Apache

Step 1) Installare i pacchetti necessari:

$ sudo su
# apt update; apt upgrade
# apt install apache2 mariadb-server libapache2-mod-php7.0 php7.0-gd php7.0-json php7.0-mysql php7.0-curl php7.0-intl php7.0-mcrypt php-imagick php7.0-zip php7.0-xml php7.0-mbstring ntfs-3g fail2ban certbot

Step 2) Configurazione Apache e Virtual Host basic

# rm -rf /var/www/html/
# mkdir -p /var/www/example.com/public_html
# nano /var/www/example.com/public_html/index.html

ed incollare dentro:

<!DOCTYPE html>
<html lang="en" dir="ltr">
<head>
<meta charset="utf-8">
<title>Welcome to example.com</title>
</head>
<body>
<h1>Success! example.com home page!</h1>
</body>
</html
# nano /etc/apache2/sites-available/example.com.conf

ed incollare dentro:

<VirtualHost *:80>
ServerName example.com
ServerAlias www.example.com
ServerAdmin webmaster@example.com
DocumentRoot /var/www/example.com/public_html

<Directory /var/www/example.com/public_html>
Options -Indexes +FollowSymLinks
AllowOverride All
</Directory>

ErrorLog ${APACHE_LOG_DIR}/example.com-error.log
CustomLog ${APACHE_LOG_DIR}/example.com-access.log combined
</VirtualHost>

poi:

# chown -R www-data: /var/www/example.com/
# mv /etc/apache2/sites-available/000-default.conf 000-default.conf.bak
# mv /etc/apache2/sites-enabled/000-default.conf 000-default.conf.bak
# a2ensite example.com
# systemctl restart apache2
# systemctl enable apache2

a questo punto collegandosi al server dovremmo vedere che funziona: Raspberry con Owncloud Letsencrypt ApacheStep 3) Chiave e Letsencrypt Creare una chiave robusta Dh (Diffie-Hellman) a 2048 bit, ci vorrà circa 20 minuti.

# openssl dhparam -out /etc/ssl/certs/dhparam.pem 2048

Per ottenere i certificati utilizzeremo certbot, installato precedentemente, che si occuperà dell’acquisizione e del rinnovo degli stessi. Utilizzeremo il plug-in Webroot che funziona creando un file temporaneo nella ${webroot-path}/.well-known/acme-challenge a cui si collegherà Letsencrypt per risolvere il DNS:

# mkdir -p /var/lib/letsencrypt/.well-known
# chgrp www-data /var/lib/letsencrypt
# chmod g+s /var/lib/letsencrypt

creare primo file di configurazione:

# nano /etc/apache2/conf-available/letsencrypt.conf

ed incollare dentro:

Alias /.well-known/acme-challenge/ "/var/lib/letsencrypt/.well-known/acme-challenge/"
<Directory "/var/lib/letsencrypt/">
AllowOverride None
Options MultiViews Indexes SymLinksIfOwnerMatch IncludesNoExec
Require method GET POST OPTIONS
</Directory>

creare secondo file raccomandato:

# nano /etc/apache2/conf-available/ssl-params.conf

ed incollare dentro:

SSLCipherSuite EECDH+AESGCM:EDH+AESGCM:AES256+EECDH:AES256+EDH
SSLProtocol All -SSLv2 -SSLv3 -TLSv1 -TLSv1.1
SSLHonorCipherOrder On
Header always set Strict-Transport-Security "max-age=63072000; includeSubDomains; preload"
Header always set X-Frame-Options DENY
Header always set X-Content-Type-Options nosniff
# Requires Apache >= 2.4
SSLCompression off
SSLUseStapling on
SSLStaplingCache "shmcb:logs/stapling-cache(150000)"
# Requires Apache >= 2.4.11
SSLSessionTickets Off

abilitare moduli e files di configurazione:

# a2enmod ssl
# a2enmod headers
# a2enmod http2
# a2enconf letsencrypt
# a2enconf ssl-params
# systemctl reload apache2

a questo punto siamo pronti ad ottenere i certificati SSL utilizzando certbot:

# certbot certonly --agree-tos --email admin@example.com --webroot -w /var/lib/letsencrypt/ -d example.com -d www.example.com

se tutto è andato bene visualizzeremo questo:

IMPORTANT NOTES:
- Congratulations! Your certificate and chain have been saved at
/etc/letsencrypt/live/example.com/fullchain.pem.
Your cert will expire on 2019-02-28. To obtain a new or tweaked
version of this certificate in the future, simply run certbot
again. To non-interactively renew *all* of your certificates, run
"certbot renew"
- If you lose your account credentials, you can recover through
e-mails sent to xxxxxxx@gmail.com.
- Your account credentials have been saved in your Certbot
configuration directory at /etc/letsencrypt. You should make a
secure backup of this folder now. This configuration directory will
also contain certificates and private keys obtained by Certbot so
making regular backups of this folder is ideal.
- If you like Certbot, please consider supporting our work by:

Donating to ISRG / Let's Encrypt: https://letsencrypt.org/donate
Donating to EFF: https://eff.org/donate-le

adesso andiamo a riconfigurare il file Virtual Host come sotto:

# nano /etc/apache2/sites-available/example.com.conf
ed incollare dentro:
 
<VirtualHost *:80> 
ServerName example.com
ServerAlias www.example.com

Redirect permanent / https://example.com/
</VirtualHost>

<VirtualHost *:443>
ServerName example.com
ServerAlias www.example.com

Protocols h2 http:/1.1

<If "%{HTTP_HOST} == 'www.example.com'">
Redirect permanent / https://example.com/
</If>

DocumentRoot /var/www/example.com/public_html
ErrorLog ${APACHE_LOG_DIR}/example.com-error.log
CustomLog ${APACHE_LOG_DIR}/example.com-access.log combined

SSLEngine On
SSLCertificateFile /etc/letsencrypt/live/example.com/cert.pem
SSLCertificateKeyFile /etc/letsencrypt/live/example.com/privkey.pem
SSLCertificateChainFile /etc/letsencrypt/live/example.com/chain.pem


</VirtualHost>
ricaricare la nuova configurazione:
 
# systemctl reload apache2
adesso si può fare un TEST SSL

Rinnovo automatico dei certificati: Come dicevo all’inizio, i certificati di Let’s Encrypt hanno una durata di 90 giorni, dopodichè bisognerà rinnovarli. Per automatizzare il rinnovo utilizzare un cronjob:
# nano /etc/cron.d/certbot
ed incollare dentro:
0 */12 * * * root test -x /usr/bin/certbot -a \! -d /run/systemd/system && perl -e 'sleep int(rand(3600))' && certbot -q renew --renew-hook "systemctl reload apache2"
Rinnovo manuale:
# certbot renew --dry-run
Raspberry con Owncloud Letsencrypt Apache
Step 4) Installazione Owncloud
# cd /tmp
# wget https://download.owncloud.org/community/owncloud-10.0.10.tar.bz2
# tar -xvf owncloud-10.0.10.tar.bz2
# chown -R www-data:www-data owncloud
# mv owncloud /var/www/example.com/public_html/
# rm /var/www/example.com/public_html/index.html
# nano /etc/apache2/sites-available/example.com.conf
e fare puntare la DocumentRoot ad owncloud:
DocumentRoot /var/www/example.com/public_html/owncloud
Creazione database ed user mysql:
# mysql -u root -p
inserire password di root, e poi i 5 comandi sotto, e settare la password per l’utente owncloud
 
1) create database owncloud;
2) create user owncloud@localhost identified by ‘password‘;
3) grant all privileges on owncloud.* to owncloud@localhost identified by ‘password‘;
4) flush privileges;
5) exit;
 
fare una modifica al file php.ini, nella sezione File Uploads, portando upload_max_filesize = 5000M.
# nano /etc/php/7.0/apache2/php.ini
come ultimo ritocco, aumentare la capacità di upload, andando a modificare il file .user.ini
# nano /var/www/example.com/public_html/owncloud/.user.ini
portando: upload_max_filesize, e post_max_size a 5000M
# systemctl restart apache2
a questo punto il server owncloud è installato, mancano solo un paio di ritocchi per evitare alcuni alert in owncloud:
# nano /etc/apache2/sites-available/example.com.conf
ed incollare dentro:
<IfModule mod_headers.c>
Header always set Strict-Transport-Security "max-age=15552000; includeSubDomain$
</IfModule>
# nano /etc/apache2/conf-available/ssl-params.conf
e commentare tutti gli Header:
SSLCipherSuite EECDH+AESGCM:EDH+AESGCM:AES256+EECDH:AES256+EDH
SSLProtocol All -SSLv2 -SSLv3 -TLSv1 -TLSv1.1
SSLHonorCipherOrder On
#Header always set Strict-Transport-Security "max-age=63072000; includeSubDomai$
#Header always set X-Frame-Options DENY
#Header always set X-Content-Type-Options nosniff
# Requires Apache >= 2.4
SSLCompression off
SSLUseStapling on
SSLStaplingCache "shmcb:logs/stapling-cache(150000)"
# Requires Apache >= 2.4.11
SSLSessionTickets Off

SSLOpenSSLConfCmd DHParameters "/etc/ssl/certs/dhparam.pem"
# systemctl restart apache2
Owncloud è installato ed è raggiungibile all’indirizzo https://example.com. Se si volesse utilizzare come storage un disco esterno, la guida continua: Step 5) Creazione della cartella di storage e relativi permessi:
# mkdir /media/owncloud-usb
# groupadd www-data
# usermod -a -G www-data www-data
# chown -R www-data:www-data /media/owncloud-usb
# chmod -R 775 /media/owncloud-usb
adesso abbiamo bisogno di conoscere UUID del disco usb ed user e group di www-data, che serviranno per configurare /etc/fstab per il montaggio automatico:
# id -u www-data; id -g www-data
# blkid
# nano /etc/fstab
ed aggiungere in una sola riga qualcosa del genere in /etc/fstab:
UUID=32E49E5027A4F8A7 /media/owncloud-usb auto nofail,uid=33,gid=33,umask=0027$,dmask=0027,noatime 0 0
# reboot
Se tutto è andato bene andare all’indirizzo https://ip_dominio_del_server ed apparirà la pagina iniziale, dove si dovrà inserire nome utente e password per l’accesso al server owncloud, nome del database, user e password dell’utente owncloud, ed infine il punto di mount. Username: owncloud Password: password Database: owncloud Server: localhost Raspberry con Owncloud Letsencrypt Apache
Raspberry con Owncloud Letsencrypt Apache
enjoy 😉