TorrentBox con qBittorrent su Raspberry Pi

Torrentbox con qBittorrent su Raspberry Pi

TorrentBox con qBittorrent su Raspberry Pi

Guida su come installare qBittorrent su Raspberry Pi, per ottenere un server Torrent e scaricare files h24 in sicurezza.

Login via ssh su Raspberry Pi

sudo apt update
sudo apt install qbittorrent-nox -y

Aggiungere l’utente qbitorrent al sistema come non root

sudo useradd -r -m qbittorrent
sudo usermod -a -G qbittorrent $USER

Creazione servizio:

sudo nano /etc/systemd/system/qbittorrent.service

ed inserire:

Unit]
Description=BitTorrent Client
After=network.target

[Service]
Type=forking
User=qbittorrent
Group=qbittorrent
UMask=002
ExecStart=/usr/bin/qbittorrent-nox -d --webui-port=8080
Restart=on-failure

[Install]
WantedBy=multi-user.target

Avvio qBittorrent:

sudo systemctl start qbittorrent
sudo systemctl enable qbittorrent

Adesso abbiamo Accesso alla WEB UI con utente admin e password adminadmin

http://ip_address:8080

1) cambiare user e password

TorrentBox con qBittorrent su Raspberry Pi

2) installare una vpn

TorrentBox con qBittorrent su Raspberry Pi

enjoy 😉


Condividere terminale via Browser con ttyd


Condividere terminale via Browser con ttyd


Condividere terminale via Browser con ttyd

Guida su come condividere il proprio terminale via web browser utilizzando ttyd. Questo trucco è molto utile soprattutto se si vuole mostrare il terminale e di conseguenza renderlo leggibile a tutti, utilizzando lo zoom del proprio browser.

$ sudo apt update
$ sudo apt-get install build-essential cmake git libjson-c-dev libwebsockets-dev
$ git clone https://github.com/tsl0922/ttyd.git
$ cd ttyd
$ mkdir build; cd build
$ cmake ..
$ sudo make; sudo make install

Avviare da terminale con il comando:

$ ttyd -p 8080 bash

poi aprire il browser all’indirizzo:

http://localhost:8080

e continuare ad eseguire i comandi nella pagina web.

enjoy 😉


NordVPN su SysLinuxOS e Debian 11


NordVPN su SysLinuxOS e Debian 11

NordVPN su SysLinuxOS e Debian 11


Guida su come configurare NordVPN, su SysLinuxOS e Debian 11 Bullseye, in modo grafico utilizzando Network Manager oppure direttamente da terminale.

Prerequisiti:

  • Abbonamento a NordVPN
  • SysLinuxOS Debian Bullseye e derivate

SysLinuxOS:

cd /etc/openvpn
sudo wget https://downloads.nordcdn.com/configs/archives/servers/ovpn.zip
sudo unzip ovpn.zip
sudo rm ovpn.zip
cd ovpn_udp
ls -al

Debian:

sudo apt-get install openvpn network-manager-openvpn-gnome ca-certificates unzip
sudo service network-manager restart
cd /etc/openvpn
sudo wget https://downloads.nordcdn.com/configs/archives/servers/ovpn.zip
sudo unzip ovpn.zip
sudo rm ovpn.zip
cd ovpn_udp
ls -al

per far partire la VPN, basta scegliere un server della lista:

sudo openvpn de1022.nordvpn.com.udp.ovpn

OpenVPN chiederà le credenziali, quindi inserire user e password.

Per utilizzare Network Manager, basta solo importare la configurazione del server scelto

NordVPN su SysLinuxOS e Debian 11

NordVPN su SysLinuxOS e Debian


enjoy 😉


Configurare Samba server su Debian 11 e SysLinuxOS


Samba è un software gratuito che consente di condividere file in rete utilizzando il protocollo SMB (Server Message Block). Samba è supportato su varie piattaforme come i sistemi operativi Windows e Unix. Guida per OS Debian based e SysLinuxOS

Step 1 Installazione
sudo apt install samba smbclient cifs-utils
Step 2 Creazione cartelle condivisione:
sudo mkdir /mnt/{private,public}
Step 3 Configurazione smb.conf
sudo nano /etc/samba/smb.conf

ed aggiunger in fondo:

[public]
comment = Public Folder
path = /mnt/public
writable = yes
guest ok = yes
guest only = yes
force create mode = 775
force directory mode = 775


[private]
comment = Private Folder
path = /mnt/private
writable = yes
guest ok = no
valid users = @smbshare
force create mode = 770
force directory mode = 770
inherit permissions = yes
Step 4 Creazione utente e gruppo:
sudo groupadd smbshare
sudo chgrp -R smbshare /mnt/private/
sudo chgrp -R smbshare /mnt/public
sudo chmod 770 /mnt/private/
sudo chmod 775 /mnt/public
sudo useradd -M -s /sbin/nologin sambauser
sudo usermod -aG smbshare sambauser
sudo smbpasswd -a sambauser
sudo smbpasswd -e sambauser

Verificare funzionamento:

sudo touch /mnt/private/test1.txt /mnt/public/test2.txt
sudo systemctl restart smbd

Accesso locale:

smbclient '\\localhost\public' -U sambauser

output ls:

edmond@syslinuxbox:~$ smbclient '\\localhost\public' -U sambauser
Enter WORKGROUP\sambauser's password:
Try "help" to get a list of possible commands.
smb: \> ls
. D 0 Sat May 28 16:52:47 2022
.. D 0 Sat May 28 16:48:41 2022
test2.txt N 0 Sat May 28 16:52:47 2022

69977312 blocks of size 1024. 40744856 blocks available
smb: \>

Accesso da client Linux:

un metodo veloce è quello di aprire il proprio file manager, nel mio caso Caja, ed inserire il percorso:

smb://sambauser@ip_address/public/

Configurare Samba server su Debian 11 e SysLinuxOS

Configurare Samba server su Debian 11 e SysLinuxOS

enjoy 😉

Installare Docker su Debian 11 e SysLinuxOS


Installare Docker su Debian 11

Installare Docker su Debian 11 e SysLinuxOS

Docker è un programma che consente di impacchettare software in contenitori, ed eseguirli su macchine virtuali . Questi contenitori sono completamente indipendenti, il che aumenta la sicurezza del contenitore, ed inoltre sono molto più leggeri rispetto a delle macchine virtuali.

Prerequisiti Debian 11 bullseye e SyslinuxOS

$ sudo apt update
$ sudo apt upgrade
$ sudo apt-get install apt-transport-https ca-certificates curl gnupg lsb-release

Chiave

$ curl -fsSL https://download.docker.com/linux/debian/gpg | sudo gpg --dearmor -o /usr/share/keyrings/docker-archive-keyring.gpg

Repository

$ echo "deb [arch=amd64 signed-by=/usr/share/keyrings/docker-archive-keyring.gpg] https://download.docker.com/linux/debian $(lsb_release -cs) stable" | sudo tee /etc/apt/sources.list.d/docker.list > /dev/null

Installazione

$ sudo apt update
$ sudo apt install docker-ce docker-ce-cli containerd.io

Docker versione

$ docker --version
Docker version 20.10.14, build a224086

Verfica servizi

$ sudo systemctl status docker
$ sudo systemctl stop docker
$ sudo systemctl start docker

Abilitazione disabilitazione al boot

$ sudo systemctl enable docker
$ sudo systemctl enable containerd.service
$ sudo systemctl disable docker

Aggiungere user al gruppo docker per evitare i privilegi root

$ sudo usermod -aG docker $USER
$ sudo reboot

Test

$ docker run hello-world

Installare Docker su Debian 11

oppure

$ docker run -it debian bash

Rimozione:

$ sudo apt autoremove docker-ce docker-ce-cli containerd.io
$ sudo rm /etc/apt/sources.list.d/docker.list
$ sudo apt update
Installare Docker su Debian 11 e SysLinuxOS


enjoy 😉


XAMPP PHP 8 su Debian Bullseye


XAMPP PHP 8 su Debian Bullseye

XAMPP PHP 8 su Debian Bullseye

XAMPP è una suite completamente gratuita e facile da installare che contiene Apache, MariaDB, PHP, e Perl. La pagina di download è la seguente, una volta scaricato l’installer, cambiare i permersi ed iniziare l’installazione:

$ chmod 755 xampp-linux-*-installer.run
$ sudo ./xampp-linux-*-installer.run --mode gtk --installer-language it

alla fine si potrà scegliere di lanciare subito xampp, e quindi andare in Manage-Servers per avviare i servizi. La schermata iniziale è raggiungibile all’indirizzo https://localhost/. Per avviare xampp da interfaccia grafica quindi utilizzare:

$ sudo /opt/lampp/manager-linux-x64.run

altrimenti si possono utilizzare i seguenti singoli comandi:

$ sudo /opt/lampp/xampp start
$ sudo /opt/lampp/xampp stop
$ sudo /opt/lampp/xampp restart
$ sudo /opt/lampp/xampp startapache
$ sudo /opt/lampp/xampp startmysql
$ sudo /opt/lampp/xampp startftp
$ sudo /opt/lampp/xampp stopapache
$ sudo /opt/lampp/xampp stopmysql
$ sudo /opt/lampp/xampp stopftp
$ sudo /opt/lampp/xampp enablessl
$ sudo /opt/lampp/xampp disablessl

Per il server ProFTP: nome utente «nobody», password «lampp». E’ necessario mettere in sicurezza xampp, creando le password di accesso per i vari servizi. Il comando è il seguente:

$ sudo /opt/lampp/xampp security
XAMPP PHP 8 su Debian Bullseye

enjoy 😉


Server DHCP su Debian 11


Server DHCP su Debian 11 Bullseye.


Installazione e configurazione di un server dhcp su Debian Bullseye:

$ sudo su
# apt install isc-dhcp-server

settare la scheda di rete da utilzzare, nel mio caso eth0:

# nano /etc/default/isc-dhcp-server
# Defaults for isc-dhcp-server initscript
# sourced by /etc/init.d/isc-dhcp-server
# installed at /etc/default/isc-dhcp-server by the maintainer scripts

#
# This is a POSIX shell fragment
#

# Path to dhcpd's config file (default: /etc/dhcp/dhcpd.conf).
#DHCPD_CONF=/etc/dhcp/dhcpd.conf

# Path to dhcpd's PID file (default: /var/run/dhcpd.pid).
#DHCPD_PID=/var/run/dhcpd.pid

# Additional options to start dhcpd with.
#       Don't use options -cf or -pf here; use DHCPD_CONF/ DHCPD_PID instead
#OPTIONS=""

# On what interfaces should the DHCP server (dhcpd) serve DHCP requests?
#       Separate multiple interfaces with spaces, e.g. "eth0 eth1".
INTERFACES="eth0"

poi modificare il file dhcpd.conf inserendo i parametri della nostra rete, nel mio caso 192.168.100.0/24:

# nano /etc/dhcp/dhcpd.conf
# Sample configuration file for ISC dhcpd for Debian
#
#

# The ddns-updates-style parameter controls whether or not the server will
# attempt to do a DNS update when a lease is confirmed. We default to the
# behavior of the version 2 packages ('none', since DHCP v2 didn't
# have support for DDNS.)
ddns-update-style none;

# option definitions common to all supported networks...
option domain-name "example.org";
option domain-name-servers ns1.example.org, ns2.example.org;
default-lease-time 600;
max-lease-time 7200;

# If this DHCP server is the official DHCP server for the local
# network, the authoritative directive should be uncommented.
#authoritative;

# Use this to send dhcp log messages to a different log file (you also
# have to hack syslog.conf to complete the redirection).
log-facility local7;

# No service will be given on this subnet, but declaring it helps the
# DHCP server to understand the network topology.

#subnet 10.152.187.0 netmask 255.255.255.0 {
#}

# This is a very basic subnet declaration.
subnet 192.168.100.0 netmask 255.255.255.0 {
range 192.168.100.150 192.168.100.160;
option routers 192.168.100.1;
option subnet-mask 255.255.255.0;
option broadcast-address 192.168.100.254;
option domain-name-servers 192.168.100.1, 192.168.100.2;
option ntp-servers 192.168.100.1;
option netbios-name-servers 192.168.100.1;
option netbios-node-type 8;
}
#subnet 10.254.239.0 netmask 255.255.255.224 {
#  range 10.254.239.10 10.254.239.20;
#  option routers rtr-239-0-1.example.org, rtr-239-0-2.example.org;
#}

# This declaration allows BOOTP clients to get dynamic addresses,
# which we don't really recommend.

#subnet 10.254.239.32 netmask 255.255.255.224 {
#  range dynamic-bootp 10.254.239.40 10.254.239.60;
#  option broadcast-address 10.254.239.31;
#  option routers rtr-239-32-1.example.org;
#}

# A slightly different configuration for an internal subnet.
#subnet 10.5.5.0 netmask 255.255.255.224 {
#  range 10.5.5.26 10.5.5.30;
#  option domain-name-servers ns1.internal.example.org;
#  option domain-name "internal.example.org";
#  option routers 10.5.5.1;
#  option broadcast-address 10.5.5.31;
#  default-lease-time 600;
#  max-lease-time 7200;
#}

# Hosts which require special configuration options can be listed in
# host statements.   If no address is specified, the address will be
# allocated dynamically (if possible), but the host-specific information
# will still come from the host declaration.

#host passacaglia {
#  hardware ethernet 0:0:c0:5d:bd:95;
#  filename "vmunix.passacaglia";
#  server-name "toccata.fugue.com";
#}

# Fixed IP addresses can also be specified for hosts.   These addresses
# should not also be listed as being available for dynamic assignment.
# Hosts for which fixed IP addresses have been specified can boot using
# BOOTP or DHCP.   Hosts for which no fixed address is specified can only
# be booted with DHCP, unless there is an address range on the subnet
# to which a BOOTP client is connected which has the dynamic-bootp flag
# set.
#host fantasia {
#  hardware ethernet 08:00:07:26:c0:a5;
#  fixed-address fantasia.fugue.com;
#}

# You can declare a class of clients and then do address allocation
# based on that.   The example below shows a case where all clients
# in a certain class get addresses on the 10.17.224/24 subnet, and all
# other clients get addresses on the 10.0.29/24 subnet.

#class "foo" {
#  match if substring (option vendor-class-identifier, 0, 4) = "SUNW";
#}

#shared-network 224-29 {
#  subnet 10.17.224.0 netmask 255.255.255.0 {
#    option routers rtr-224.example.org;
#  }
#  subnet 10.0.29.0 netmask 255.255.255.0 {
#    option routers rtr-29.example.org;
#  }
#  pool {
#    allow members of "foo";
#    range 10.17.224.10 10.17.224.250;
#  }
#  pool {
#    deny members of "foo";
#    range 10.0.29.10 10.0.29.230;
#  }
#}

dopo le modifiche riavviare il servizio:

# systemctl restart isc-dhcp-server.service
Server DHCP su Debian 11 Bullseye

enjoy ?

VMware Workstation 16 Player Debian 11

VMware Workstation 16 Player Debian 11


Guida su come installare VMware Workstation 16 Player su Debian 11.

  • Primo step:

Download diretto dal sito ufficiale

  • Secondo:

installazione pacchetti essenziali

sudo apt install build-essential linux-headers-$(uname -r)

Terzo:

installazione

cd Downloads
chmod +x VMware-Player-Full-*.bundle
sudo ./VMware-Player-Full-*.bundle
sudo apt install open-vm-tools-desktop

Quarto:

git clone https://github.com/mkubecek/vmware-host-modules.git
cd vmware-host-modules
git checkout workstation-16.2.3
make
sudo make install

Disinstallazione:

sudo vmware-installer --uninstall-product vmware-player


enjoy 😉


FreePBX Trunk Pjsip su FRITZBox

 FreePBX Trunk Pjsip su FRITZ!Box

FreePBX Trunk Pjsip su FRITZ!Box


Guida su come configurare un FreePBX Trunk Pjsip su FRITZBox, per funzionare in parallelo ad un centralino FreePBX/Asterisk. Io ho una connessione dati e voce con Vodafone, ed il mio numero si registra correttamente attraverso il router FRITZ!Box, utilizzando dei dect. I router FRITZ!Box, hanno un centralino incorporato, che in maniera semplice registrano sia i telefoni analogici che i telefoni voip, ma se si volesse  aumentare di molto i telefoni, ed avere un centralino più strutturato, con un IVR per esempio, bisogna affidarsi al centralino Asterisk/FreePBX. Questa guida parte dal presupposto, che il FRITZ!Box ed il server PBX sono gia configurati e funzionanti.

1) Creare interno server FreePBX direttamente sul FRITZ!Box:

Menù Telefonia > Dispositivi di telefonia > Configurazione nuovo dispositivo, e poi seguire le immagini:

FreePBX Trunk Pjsip su FRITZ!BoxFreePBX Trunk Pjsip su FRITZ!BoxFreePBX Trunk Pjsip su FRITZ!BoxNotare che il nome utente è numerico e queste credenziali andranno inserite successivamente nel Trunk pjsip in FreePBX.


2) Creazione Trunk pjsip in FreePBX

Esempio delle immagini:

Trunk Name=FreePBX
Outbound caller ID=numero telefonico
CID Options=Force Trunk CID
Maximum Channels=2


Trunk Pjsip Settings:

username=15051948
password=PasswordDifficile
server=192.168.1.1 (ip FRITZ!Box)
porta=5060 udp


Trunk Pjsip Settings Advanced:

Contact User=15051948
From User=15051948


Trunk Codecs:


In conclusione, con questo tipo di configurazione abbiamo integrato il nostro centralino Asterisk/FreePBX, con la robustezza di un router FRITZ!Box.

FreePBX Trunk Pjsip su FRITZ!Box

enjoy 😉


Asterisk 18 FreePBX 16 su Raspberry Pi 4 e Raspberry Pi OS Bullseye


Asterisk 18 FreePBX 16 su Raspberry Pi 4 e Raspberry Pi OS Bullseye
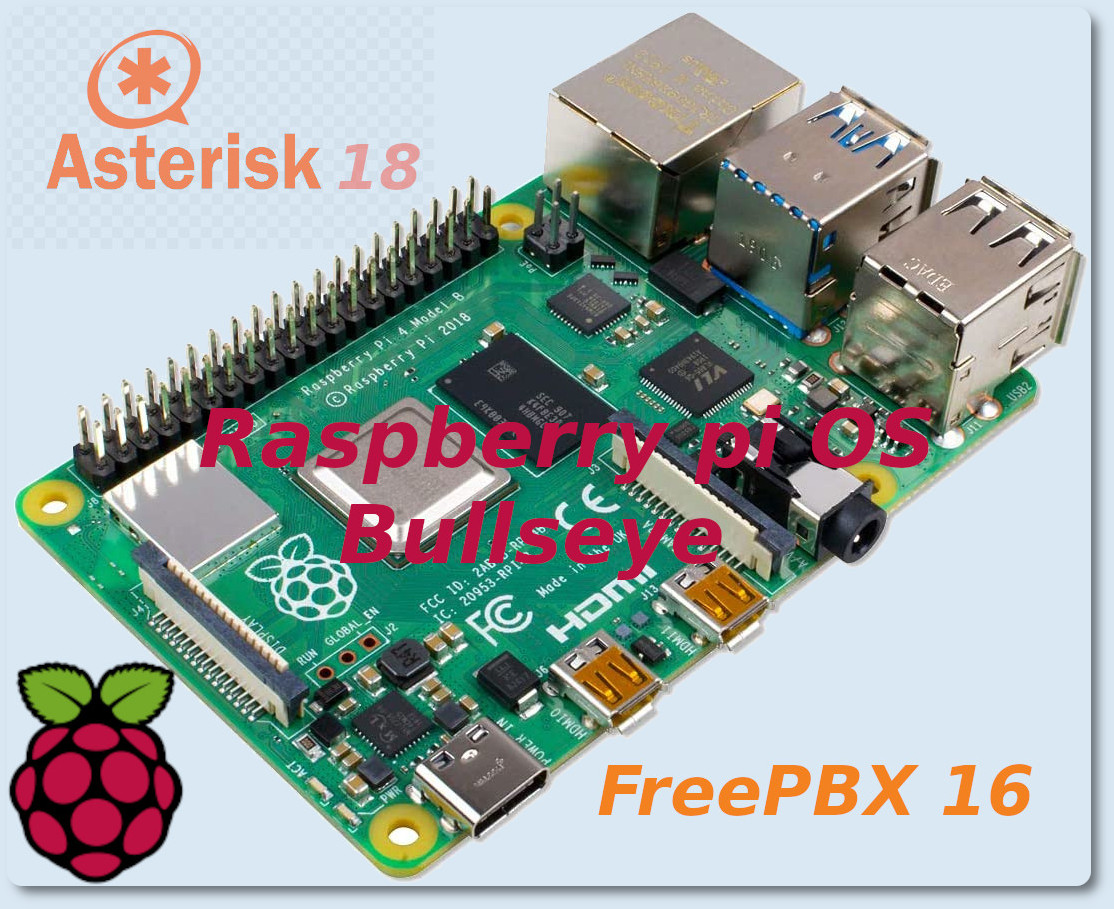
Asterisk 18 FreePbx 16 su Raspberry Pi 4 e Raspberry Pi OS Bullseye


In questa guida aggiornata, scriverò di una installazione su single board Raspberri py 4 con Raspberry Pi OS Bullseye 11, di Asterisk 18 e Freepbx 16. FreePBX 16 funziona bene, e la novità principale è il supporto a php7.4. Esiste anche una versione già pronta, raspbx, ma io preferisco installare tutto da me, poichè il sistema risulta molto più fluido. I passaggi successivi saranno eseguiti come utente root, su una nuova installazione di Raspberry Pi OS Bullseye lite. L’installazione prenderà circa 90 minuti, e prevede che il sistema sia già stato installato e che si abbia un accesso ssh.

1) Aggiornare il sistema

$ sudo su
# apt update
# apt upgrade -y
# reboot
2) Scaricare le dipendenze ed i servizi necessari
# apt install -y wget bison flex php php-pear php-cgi php-common php-curl php-mbstring php-gd php-mysql php-php-gettext php-bcmath php-zip php-xml php-imap php-json php-snmp php-fpm libapache2-mod-php git curl libnewt-dev libssl-dev libncurses5-dev subversion libsqlite3-dev build-essential libedit-dev libjansson-dev libxml2-dev uuid-dev dh-make libssl-dev sox mariadb-client-10.5 mariadb-server-10.5

3) Installare nodejs

# curl -sL https://deb.nodesource.com/setup_18.x | sudo -E bash -
# apt install -y nodejs

4) Reboot server

# reboot

5) Scaricare Asterisk 18 e FreePBX 16

$ sudo su
# cd /usr/src
# wget https://downloads.asterisk.org/pub/telephony/asterisk/asterisk-18-current.tar.gz
# wget https://mirror.freepbx.org/modules/packages/freepbx/freepbx-16.0-latest.tgz

6) Installare Asterisk 18

# tar xvfz asterisk-18-current.tar.gz
# rm -rf asterisk-18-current.tar.gz
# cd asterisk-18.*
# contrib/scripts/get_mp3_source.sh
# ./contrib/scripts/install_prereq install
# ./configure --with-jansson-bundled
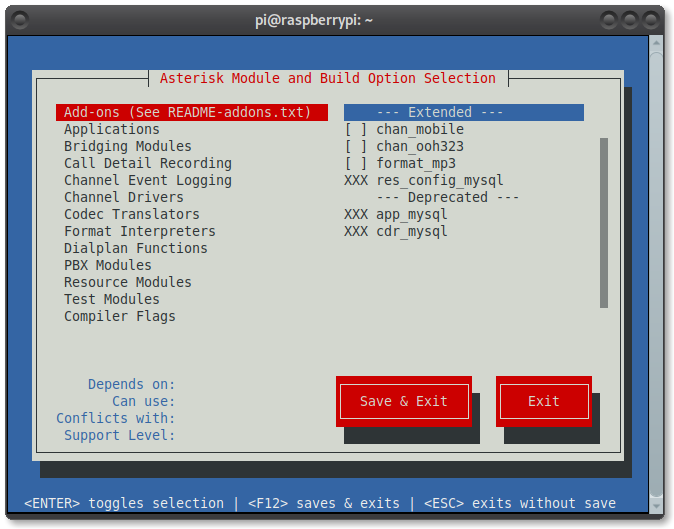
# make menuselect


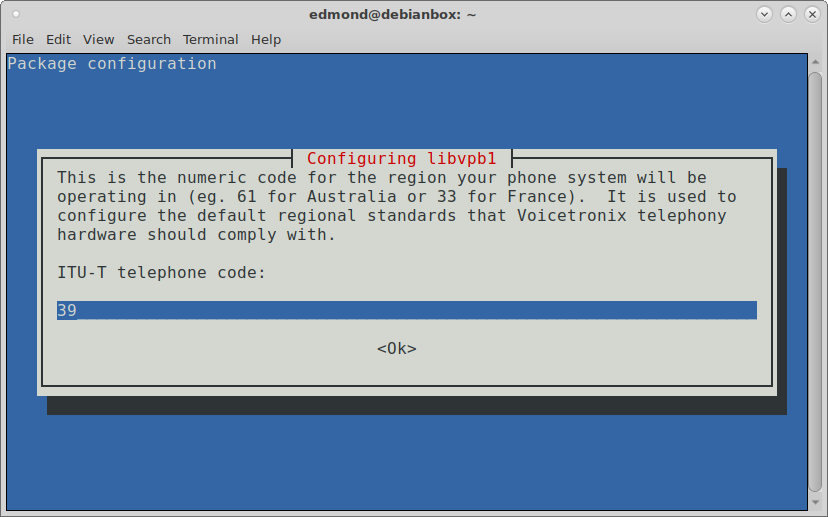
inserire il prefisso internazionale, nel nostro caso 39:

Asterisk 14 Freepbx 14 su Debian Stretch 9.1abilitare format_mp3:

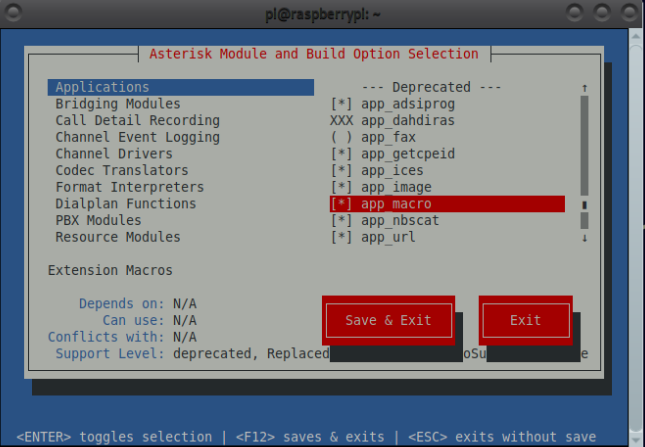
abilitare “macro” in make menuselect > Application > app_macro:

Asterisk 18 FreePBX 16 su Raspberry Pi 4 e Raspberry Pi OS Bullseye

quindi:

# make -j8
# make install
# make samples
# make config

7) Creazione utente Asterisk e permessi

# groupadd asterisk
# useradd -r -d /var/lib/asterisk -g asterisk asterisk
# usermod -aG audio,dialout asterisk
# chown -R asterisk.asterisk /etc/asterisk
# chown -R asterisk.asterisk /var/{lib,log,run,spool}/asterisk
# chown -R asterisk.asterisk /usr/lib/asterisk
# sed -i 's/#AST_USER="asterisk"/AST_USER="asterisk"/g' /etc/default/asterisk
# sed -i 's/#AST_GROUP="asterisk"/AST_GROUP="asterisk"/g' /etc/default/asterisk
# systemctl restart asterisk
# /lib/systemd/systemd-sysv-install enable asterisk

verificare che asterisk funzioni correttamente:

# asterisk -rvvv

8) Configurazione Apache2

# cp /etc/apache2/apache2.conf /etc/apache2/apache2.conf_orig
# sed -i 's/AllowOverride None/AllowOverride All/' /etc/apache2/apache2.conf
# sed -i 's/^\(User\|Group\).*/\1 asterisk/' /etc/apache2/apache2.conf
# mv /var/www/html /var/www/html.bak
# a2enmod rewrite
# systemctl restart apache2

9) Installare FreePBX 16

# cd /usr/src/
# tar xvfz freepbx-16.0-latest.tgz
# rm -rf freepbx-16.0-latest.tgz
# cd freepbx
# ./install -n
# fwconsole chown
# fwconsole ma refreshsignatures
# fwconsole ma installall
# fwconsole reload
# fwconsole restart

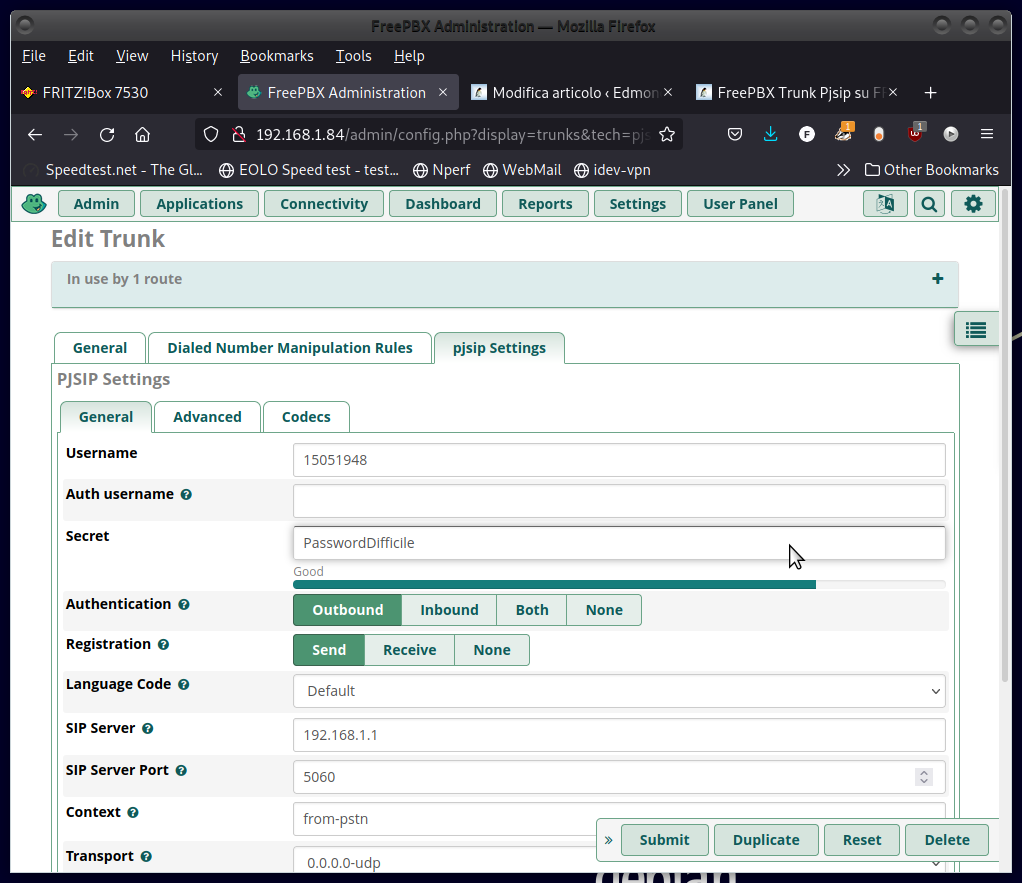
In conclusione, se tutto è andato bene il server Asterisk è raggiungibile all’indirizzo http://ip_raspberry. La prima cosa da fare è quella di scegliere nome utente, password e mail, per accedere al pannello di amministrazione. Andare poi nel menu Admin-Module Admin e scaricare ed aggiornare i moduli rimanenti.


enjoy 😉