Trasferire cartelle tra due hosts locale-remoto in Linux con SCP


Trasferire cartelle tra due hosts locale-remoto in Linux con SCP

Il comando SCP in Linux è usato per trasferire files o cartelle in maniera sicura usando ssh, tra server locali e/o remoti.

Trasferire cartelle tra due hosts locale-remoto in Linux con SCP


Copiare file da locale a remoto:

# scp -v /path/local/file.txt remoteuser@remotehost:/remote/path/

se si utilizza una porta differente:

# scp -v -P 2200 /path/local/file.txt remoteuser@remotehost:/remote/path/

Copiare file da remoto a locale

# scp -v remoteuser@remotehost:/path/file.txt /path/local

Copiare cartella in maniera ricorsiva e compressa da locale a remoto:

# scp -vrC -P 2200 /path/local/folder remoteuser@remotehost:/remote/path/

Copiare cartella in maniera ricorsiva e compressa da remoto a locale:

# scp -vrC -P 2200 remoteuser@remotehost:/remote/folder/ /path/local/

Limitare la banda:

# scp -vrC -l 500 -P 2200 /path/folder remoteuser@remotehost:/remote/path/

Copiare file/cartella tra 2 hosts remoti:

# scp -v remoteuser1@remotehost1:/path/file.txt remoteuser2@remotehost2::/path/directory/


enjpy 😉

Backup del Sistema con Rsync

Backup del Sistema con Rsync

Backup del Sistema con Rsync. Rsync è un leggero e potente strumento per il backup. Permette di eseguire backup incrementali, salvando i soli file modificati o aggiunti rispetto all’ultima operazione di backup, sia in locale che in remoto. Si può utilizzare per un backup dell’intero sistema o di cartelle specifiche.

Installazione:

# apt install rsync -y

Rsync locale:

# rsync -zav /percorso/origine /percorso/backup

per cancellare nella cartella di destinazione i file non più presenti nella cartella di origine basta aggiungere l’opzione –delete:

# rsync --delete -zav /percorso/origine /percorso/backup

Backup del Sistema:

per escludere dal backup files o cartelle si utilizza l’opzione –exclude:

# rsync -zaAXv --exclude={"/dev/*","/proc/*","/sys/*","/tmp/*","/run/*","/mnt/*","/media/*","/lost+found"} / /percorso/backup

Rsync da locale a remoto con ssh:

$ rsync -zavh -e ssh /cartella/origine_file/ remoteuser@remotehost:/cartella/backup

se si utilizza una porta diversa per ssh:

$ rsync -zavh -e 'ssh -p 2200' /cartella/origine_file/ remoteuser@remotehost:/cartella/backup

per visualizzare il progresso del backup:

$ rsync -zavh -e 'ssh -p 2200' --progress /cartella/origine_file/ remoteuser@remotehost:/cartella/backup

Rsync da remoto a locale con ssh:

$ rsync -zvah -e 'ssh -p 2200' remoteuser@remotehost:/percorso/del/file /cartella/destinazione

Rsync senza password ssh:

# ssh-keygen

alle domande successive premere sempre invio e copiare la chiave sul server:

# ssh-copy-id -i $HOME/.ssh/id_rsa.pub remoteuser@remotehost

a questo punto se tutto è andato bene non verrà più richiesta la password e si può accedere direttamente:

# ssh remoteuser@remotehost

Backup automatico:

a questo punto si può decidere che tipo di backup effettuare:

ogni giorno alle 23:00

00 23 * * *

ogni sabato alle 23:00

00 23 * * 6

oppure al 1° di ogni mese alle 23:00:

00 23 1 * *

$ crontab -e

ed inserire l’opzione desiderata:

00 23 * * * rsync -zav /percorso/origine /percorso/backup

Backup del Sistema con Rsync

enjoy 😉


Speedtest da teminale in Linux con Testspeed


Speedtest da teminale in Linux con Testspeed

Speedtest da teminale in Linux con Testspeed

Qualche tempo fa avevo scritto un post su come effettuare uno speedtest da terminale, utilizzando speedtest-cli. Adesso utilizzo anche un'altro programmino in python, che si chiama Testspeed. Anche questo si appoggia a speedtest.net.

Installazione:

$ sudo apt-get install git python-lxml python-argparse
$ git clone git://github.com/Janhouse/tespeed.git
$ cd tespeed
$ git submodule init
$ git submodule update

Utilizzo:

$ cd tespeed/
$ ./tespeed.py

per una lista di server disponibili utilizzare:

$ ./tespeed.py -ls
edmond@debianbox:~/tespeed$ ./tespeed.py -ls
Getting ready
Printing CSV formated results to STDOUT.
Loading speedtest configuration...
IP: 151.66.XXX.XXX; Lat: 45.626800; Lon: 9.053600; ISP: WIND
Loading server list...
1. https://speedtest.siportal.it/speedtest/ (SIPORTAL SRL, Milano, Italy) [23.02 km]
2. https://speedtest.cheapnet.it/speedtest/ (CWNET, Milan, Italy) [23.54 km]
3. https://speedtestmi1.telecomitalia.it/speedtest/ (Telecom Italia S.p.A., Milan, Italy) [23.54 km]
4.  (H3G, Milan, Italy) [23.54 km]
5.  (Fastweb SpA, Milan, Italy) [23.54 km]
6. https://speedtest.vodafone.it/speedtest/speedtest/ (Vodafone IT, Milan, Italy) [23.54 km]
7.  (Join srl, Milan, Italy) [23.54 km]
8.  (ItaliaOnline, Milan, Italy) [23.54 km]
9. https://79.171.160.66/speedtest/speedtest/ (Linkem SPA, Milan, Italy) [23.54 km]
10.  (CDLAN S.R.L., Milan, Italy) [23.54 km]

per utilizzare il server vodafone:

$ ./tespeed.py https://speedtest.vodafone.it/speedtest/speedtest/

Speedtest da teminale in Linux con Testspeed

enjoy 😉


Variare la velocità della scheda di rete in Linux


Variare la velocità della scheda di rete in Linux

Variare la velocità della scheda di rete in Linux

Per variare velocità e duplex di una scheda di rete ethernet su Linux, si può usare ethtool:

# apt install ethtool

Ottenere informazioni sulla scheda di rete:

# ethtool eth0
root@debianbox:/home/edmond# ethtool eth0
Settings for eth0:
    Supported ports: [ TP MII ]
    Supported link modes:   10baseT/Half 10baseT/Full
                            100baseT/Half 100baseT/Full
                            1000baseT/Half 1000baseT/Full
    Supported pause frame use: No
    Supports auto-negotiation: Yes
    Advertised link modes:  10baseT/Half 10baseT/Full
                            100baseT/Half 100baseT/Full
                            1000baseT/Full
    Advertised pause frame use: Symmetric Receive-only
    Advertised auto-negotiation: Yes
    Link partner advertised link modes:  10baseT/Half 10baseT/Full
                                         100baseT/Half 100baseT/Full
    Link partner advertised pause frame use: Symmetric
    Link partner advertised auto-negotiation: Yes
    Speed: 100Mb/s
    Duplex: Full
    Port: MII
    PHYAD: 0
    Transceiver: internal
    Auto-negotiation: on
    Supports Wake-on: pumbg
    Wake-on: g
    Current message level: 0x00000033 (51)
                   drv probe ifdown ifup
    Link detected: yes

Disabilitare auto-negoziazione:

# ethtool -s eth0 autoneg off

Disabilitare auto-negoziazione e cambiare velocità a 10/100/1000:

# ethtool -s eth0 speed 10 duplex half autoneg off
# ethtool -s eth0 speed 100 duplex half autoneg off
# ethtool -s eth0 speed 1000 duplex half autoneg off

per abilitare subito le modifiche:

# ifconfig eth0 down && ifconfig eth0 up

le modifiche sono da considerarsi provvisorie, e verranno perse al riavvio. Ad ogni modo volendo esistono diversi modi per renderli definitivi.

Variare la velocità della scheda di rete in Linux

enjoy 😉


Server DHCP su Debian Jessie


Server DHCP su Debian Jessie. Installazione e configurazione di un server dhcp su Debian Jessie:

# apt install isc-dhcp-server

settare la scheda di rete da utilzzare, nel mio caso eth0::

# nano /etc/default/isc-dhcp-server


# Defaults for isc-dhcp-server initscript
# sourced by /etc/init.d/isc-dhcp-server
# installed at /etc/default/isc-dhcp-server by the maintainer scripts

#
# This is a POSIX shell fragment
#

# Path to dhcpd's config file (default: /etc/dhcp/dhcpd.conf).
#DHCPD_CONF=/etc/dhcp/dhcpd.conf

# Path to dhcpd's PID file (default: /var/run/dhcpd.pid).
#DHCPD_PID=/var/run/dhcpd.pid

# Additional options to start dhcpd with.
#       Don't use options -cf or -pf here; use DHCPD_CONF/ DHCPD_PID instead
#OPTIONS=""

# On what interfaces should the DHCP server (dhcpd) serve DHCP requests?
#       Separate multiple interfaces with spaces, e.g. "eth0 eth1".
INTERFACES="eth0"


poi modificare il file dhcpd.conf inserendo i parametri della nostra rete, nel mio caso 192.168.100.0/24:

# nano /etc/dhcp/dhcpd.conf
# Sample configuration file for ISC dhcpd for Debian
#
#

# The ddns-updates-style parameter controls whether or not the server will
# attempt to do a DNS update when a lease is confirmed. We default to the
# behavior of the version 2 packages ('none', since DHCP v2 didn't
# have support for DDNS.)
ddns-update-style none;

# option definitions common to all supported networks...
option domain-name "example.org";
option domain-name-servers ns1.example.org, ns2.example.org;
default-lease-time 600;
max-lease-time 7200;

# If this DHCP server is the official DHCP server for the local
# network, the authoritative directive should be uncommented.
#authoritative;

# Use this to send dhcp log messages to a different log file (you also
# have to hack syslog.conf to complete the redirection).
log-facility local7;

# No service will be given on this subnet, but declaring it helps the
# DHCP server to understand the network topology.

#subnet 10.152.187.0 netmask 255.255.255.0 {
#}

# This is a very basic subnet declaration.
subnet 192.168.100.0 netmask 255.255.255.0 {
range 192.168.100.150 192.168.100.253;
option routers 192.168.100.1;
option subnet-mask 255.255.255.0;
option broadcast-address 192.168.100.254;
option domain-name-servers 192.168.100.1, 192.168.100.2;
option ntp-servers 192.168.100.1;
option netbios-name-servers 192.168.100.1;
option netbios-node-type 8;
}
#subnet 10.254.239.0 netmask 255.255.255.224 {
#  range 10.254.239.10 10.254.239.20;
#  option routers rtr-239-0-1.example.org, rtr-239-0-2.example.org;
#}

# This declaration allows BOOTP clients to get dynamic addresses,
# which we don't really recommend.

#subnet 10.254.239.32 netmask 255.255.255.224 {
#  range dynamic-bootp 10.254.239.40 10.254.239.60;
#  option broadcast-address 10.254.239.31;
#  option routers rtr-239-32-1.example.org;
#}

# A slightly different configuration for an internal subnet.
#subnet 10.5.5.0 netmask 255.255.255.224 {
#  range 10.5.5.26 10.5.5.30;
#  option domain-name-servers ns1.internal.example.org;
#  option domain-name "internal.example.org";
#  option routers 10.5.5.1;
#  option broadcast-address 10.5.5.31;
#  default-lease-time 600;
#  max-lease-time 7200;
#}

# Hosts which require special configuration options can be listed in
# host statements.   If no address is specified, the address will be
# allocated dynamically (if possible), but the host-specific information
# will still come from the host declaration.

#host passacaglia {
#  hardware ethernet 0:0:c0:5d:bd:95;
#  filename "vmunix.passacaglia";
#  server-name "toccata.fugue.com";
#}

# Fixed IP addresses can also be specified for hosts.   These addresses
# should not also be listed as being available for dynamic assignment.
# Hosts for which fixed IP addresses have been specified can boot using
# BOOTP or DHCP.   Hosts for which no fixed address is specified can only
# be booted with DHCP, unless there is an address range on the subnet
# to which a BOOTP client is connected which has the dynamic-bootp flag
# set.
#host fantasia {
#  hardware ethernet 08:00:07:26:c0:a5;
#  fixed-address fantasia.fugue.com;
#}

# You can declare a class of clients and then do address allocation
# based on that.   The example below shows a case where all clients
# in a certain class get addresses on the 10.17.224/24 subnet, and all
# other clients get addresses on the 10.0.29/24 subnet.

#class "foo" {
#  match if substring (option vendor-class-identifier, 0, 4) = "SUNW";
#}

#shared-network 224-29 {
#  subnet 10.17.224.0 netmask 255.255.255.0 {
#    option routers rtr-224.example.org;
#  }
#  subnet 10.0.29.0 netmask 255.255.255.0 {
#    option routers rtr-29.example.org;
#  }
#  pool {
#    allow members of "foo";
#    range 10.17.224.10 10.17.224.250;
#  }
#  pool {
#    deny members of "foo";
#    range 10.0.29.10 10.0.29.230;
#  }
#}

dopo le modifiche riavviare il servizio:

# /etc/init.d/isc-dhcp-server restart

Server DHCP su Debian Jessie

enjoy 😉


OpenVPN con DD-WRT Debian ed iPhone con ios 10


dd-wrt

OpenVPN con DD-WRT Debian ed iPhone con ios 10. Con l'arrivo di ios 10 non è più possibile utilizzare una VPN PPTP , ed era quella che io usavo velocemente per connettermi al mio router linksys e1220 aggiornato con dd-wrt. Questa guida mostra come ottenere una VPN funzionante utilizzando OpenVpn server direttamente dal nostro router, e come creare i vari certificati e chiavi con relativa configurazione lato client, questo sia su Debian che su iPhone 6S con ios 10. Io utilizzo Debian Jessie, ma questa guida vale per tutte le distro. Iniziamo.

OpenVPN con DD-WRT Debian ed iPhone con ios 10

Installazione server OpenVpn:

# apt install openvpn easy-rsa
# mkdir /etc/openvpn/easy-rsa/
# cp -r /usr/share/easy-rsa/* /etc/openvpn/easy-rsa/
# nano /etc/openvpn/easy-rsa/vars

a questo punto modificare in base alle proprie esigenze il file vars, come sotto, così successivamente basterà premere Invio quasi sempre.

export KEY_COUNTRY="IT"
export KEY_PROVINCE="Lombardia"
export KEY_CITY="Milano"
export KEY_ORG="DDWRT-VPN"
export KEY_EMAIL="me@myhost.mydomain"
export KEY_OU="DDWRT-VPN"

Creazione certificati/chiavi lato server:

# cd /etc/openvpn/easy-rsa
# source vars
# ./clean-all
# ./build-ca
# ./build-key-server serverddwrt
# ./build-dh

i certificati verranno creati in /etc/openvpn/easy-rsa

Creazione certificati/chiavi lato client:

io ho creato diverse chiavi per i miei devices:

# source vars
# ./build-key iphone
# ./build-key ipad
# ./build-key debianbox
# ./build-key win10

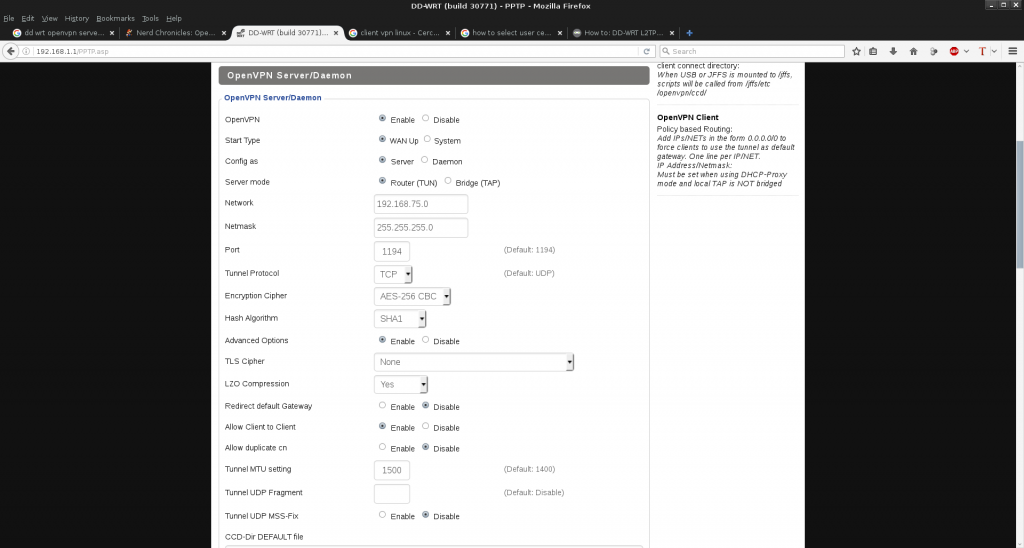
a questo punto tutti i certificati e le chiavi sono state create nella cartella keys in /etc/openvpn/easy-rsa/keys. Non rimane che accedere al nostro router di solito , ed andare in Services-VPN ed abilitare OpenVPN Server/Daemon, come si vede nell'immagine sotto. Nel mio caso la mia rete è 192.168.1.1 e per OpenVpn ho scelto la classe IP 192.168.75.0.

OpenVPN su DD-WRT Debian ed iPhone con ios 10

adesso bisogna aprire con un editor di testo i vari certificati e fare un copia ed incolla di tutto quello che si trova tra –BEGIN CERTIFICATE– e —END CERTIFICATE–. I certificati da incollare direttamente nella web gui sono i seguenti:

Public Server Cert= serverddwrt.crt
CA CERT= ca.crt
Private Server Key = serverddwrt.key
DH PEM = dh2048.pem

ddwrt-openserver-crt

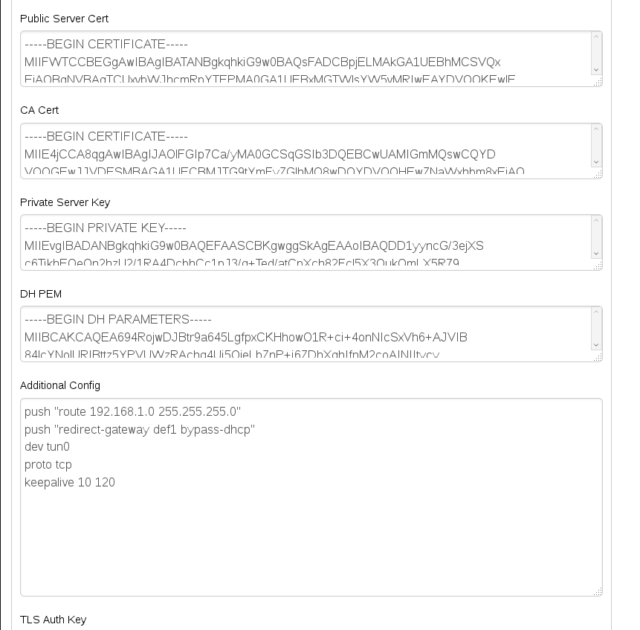
nella sezione più in basso Additional Config inserire:

push "route 192.168.1.0 255.255.255.0"
push "redirect-gateway def1 bypass-dhcp"
dev tun0
proto tcp
keepalive 10 120

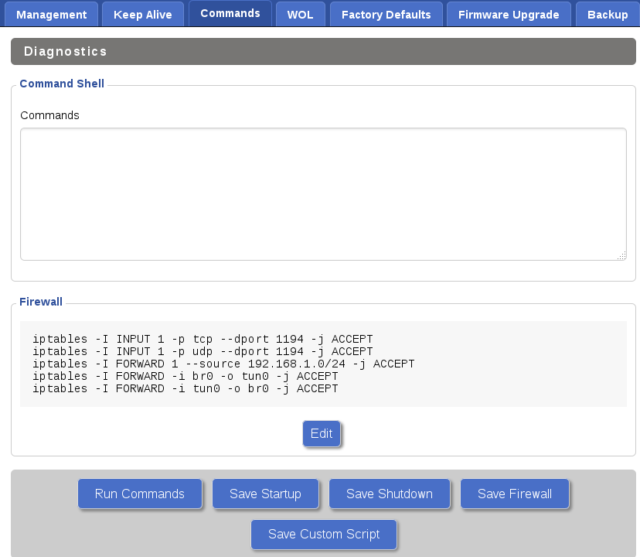
poi andare in Administration-Commands ed inserire:

iptables -I INPUT 1 -p tcp --dport 1194 -j ACCEPT
iptables -I INPUT 1 -p udp --dport 1194 -j ACCEPT
iptables -I FORWARD 1 --source 192.168.1.0/24 -j ACCEPT
iptables -I FORWARD -i br0 -o tun0 -j ACCEPT
iptables -I FORWARD -i tun0 -o br0 -j ACCEPT

e premere Save Firewall.

firewall

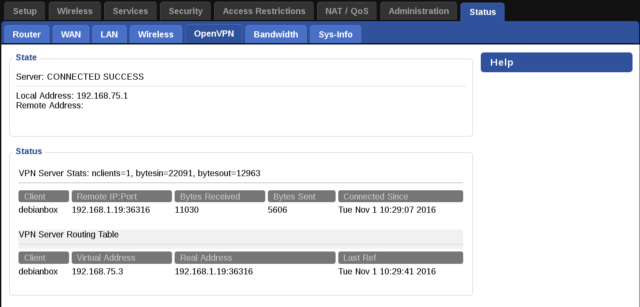
per avere conferma che tutto è andato bene, portarsi in Status-OpenVpn e si dovrebbe leggere Server: CONNECTED SUCCESS

ddwrt-openvpn


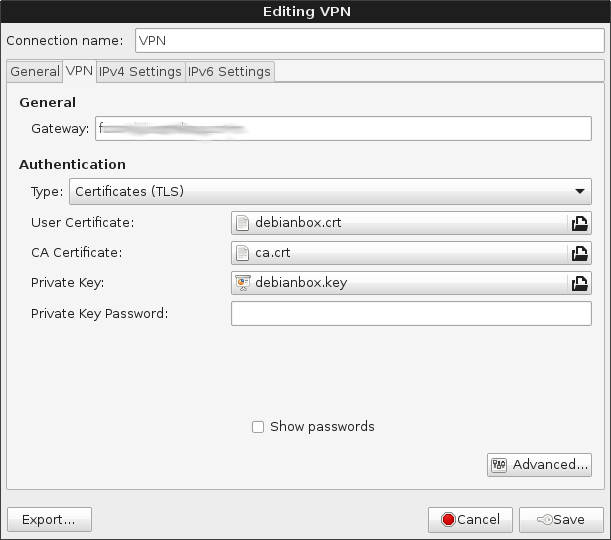
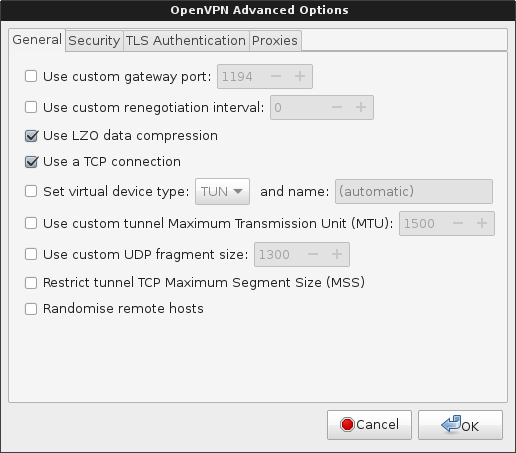
Configurazione di OpenVpn client su Debian Jessie:

# apt install network-manager-openvpn network-manager-openvpn-gnome

e configurarlo come sotto:

network-manager-openvpn

network-manager-openvpn-advanced


Configurazione iPhone:

OpenVPN con DD-WRT Debian ed iPhone con ios 10


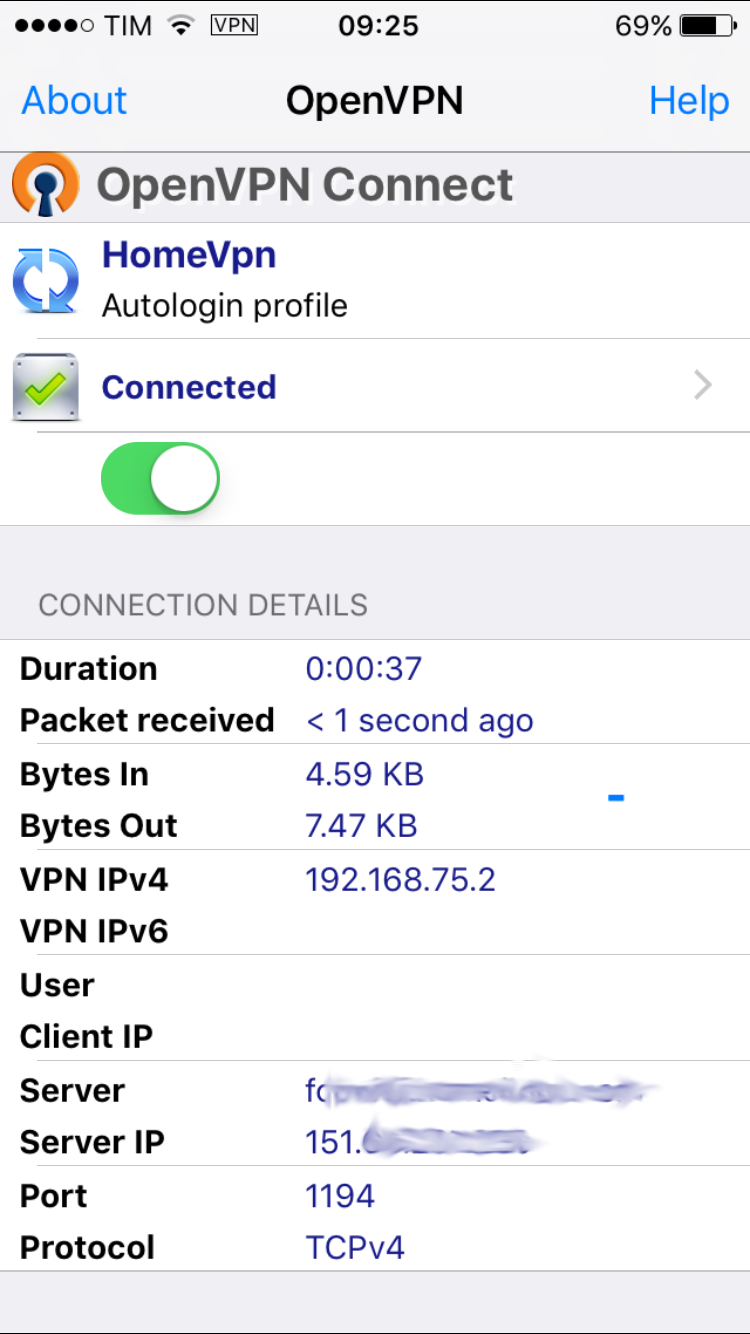
Per prima cosa installare direttamente da Apple Store OpenVpn. Dopodichè creare un file iphone.ovpn come sotto:

client
dev tun
proto tcp
remote inserire_indirizzo_IP/DDNS 1194
nobind
persist-key
persist-tun
verb 4
float
ca ca.crt
cert iphone.crt
key iphone.key
comp-lzo yes
tun-mtu 1500
auth SHA1
cipher AES-256-CBC

a questo punto tramite iTunes, caricare all'interno del programma OpenVpn i 4 files:

  1. ca.crt
  2. iphone.crt
  3. iphone.key
  4. iphone.ovpn

OpenVPN con DD-WRT Debian ed iPhone con ios 10

enjoy 😉


(Solved) login incorrect problem con Vsftp


(Solved) login incorrect problem con Vsftp. Questo è un errore che si è presentato nel momento in cui ho cercato di accedere al server ftp, nella fattispecie Vsftp. Naturalmente user e password erano corretti, ma molto probabilmente qualcosa è cambiato in vsftpd. Il problema si risolve modificando la stringa inerente a pam in vsftpd.conf:

# nano /etc/vsftpd.conf

da così:

# This string is the name of the PAM service vsftpd will use.
pam_service_name=vsftp

a così:

# This string is the name of the PAM service vsftpd will use.
pam_service_name=ftp

enjoy 😉


( Solved ) OwnCloud Maintenance Mode


Solved OwnCloud Maintenance Mode

Solved OwnCloud Maintenance Mode

Dopo ogni aggiornamento di ownCloud, quando si cerca di accedere al pannello di controllo, il messaggio che appare è quello nella figura sopra. OwnCloud in Maintenance Mode. Per risolvere il problema:

sudo /var/www/owncloud/config/config.php

ed alla voce maintenance sostituire "true" con "false". Dopodichè ricaricare la pagina e procedere con l'aggiornamento.

Solved OwnCloud Maintenance Mode

enjoy 😉


Lettore impronte ID 138a:0050 Validity Sensors su Debian Jessie


Lettore impronte ID 138a:0050 Validity Sensors su Debian Jessie

Pacchetti deb per Debian ed Ubuntu.

Lettore impronte ID 138a:0050 Validity Sensors su Debian Jessie. Dopo aver preso un Notebook HP ENVY 15-k208nl, e fatto una prima guida su come far funzionare l'hardware su Debian Jessie, successivamente mi sono trovato ad affrontare il problema del Lettore di impronte digitale ID 138a:0050 Validity Sensors. In realtà il problema è relativo a tutte le distro, Ubuntu incluso. Praticamente per far fuzionare il lettore di impronte servirebbero i driver vfs0050.

edmond@debianbox:~$ lsusb
Bus 002 Device 001: ID 1d6b:0003 Linux Foundation 3.0 root hub
Bus 001 Device 004: ID 8087:07dc Intel Corp.
Bus 001 Device 003: ID 138a:0050 Validity Sensors, Inc.
Bus 001 Device 002: ID 064e:c341 Suyin Corp.
Bus 001 Device 001: ID 1d6b:0002 Linux Foundation 2.0 root hub

cercando in giro ho scoperto che esiste una patch creata due anni fa e non più aggiornata poiche l'autore è morto 🙁 detto questo esiste anche qualche problemino nel farla funzionare, ed a questo proposito voglio condividere 2 pacchetti deb creati da me, dove il primo installa il driver vfs0050 ed il secondo installa FingerprintGui, che sarebbe l'alternativa, migliore, a quello presente nei repository col nome di fprint-demo. Per installare il tutto seguire gli step seguenti:

sudo apt remove --purge libfprint0 fprintd libpam-fprintd
wget https://bit.ly/28ZEyZQ -O libfprint_0.5.1.2-1_amd64.deb
wget https://bit.ly/28VRuxQ -O fingerprint-gui_1.08-1_amd64.deb
sudo dpkg -i fingerprint-gui_1.08-1_amd64.deb libfprint_0.5.1.2-1_amd64.deb
sudo apt install libfprint0 fprintd libpam-fprintd libqca2 libqtxml4-perl

FingerprintGui deve essere lanciato come root, lo stesso vale per fprint-demo:

sudo fingerprint-gui
sudo fprint_demo

una volta installati i pacchetti per abilitare l'autenticazione con impronte, per chi usa Mate, basta andare in System-Control Centre-About Me:

Lettore impronte ID 138a:0050 Validity Sensors su Debian Jessie

Lettore impronte ID 138a:0050 Validity Sensors su Debian Jessie

per chi invece usa Gnome, la procedura è quasi simile. Ho testato i pacchetti su Debian Jessie, Strech, ed Ubuntu 16.04. Funziona sia con Lightdm che con GDM, con sudo e con su, il problema vero e proprio è che fallisce l'autenticazione, cosa che sinceramente succede anche su Windows 10. Successivamente integrerò la guida per la compilazione dei due pacchetti. con relative dipendenze.

Lettore impronte ID 138a:0050 Validity Sensors su Debian Jessie

enjoy 😉


Owncloud Client su Debian Jessie/Strech


Owncloud Client su Debian Jessie

Owncloud Client su Debian Jessie/Strech. Dopo aver creato un server Owncloud su raspberry pi 3, lo step successivo è stato quello di installare Owncloud Client su Debian Jessie, su windows, ipad ed iphone. Installando il client direttamente dai repository Debian si incorre in un errore di autenticazione: owncloud client linux error wrong credentials. Per risolvere il problema bisogna scaricare ed installare il client direttamente dal sito ufficiale.

# echo 'deb https://download.opensuse.org/repositories/isv:/ownCloud:/desktop/Debian_8.0/ /' >> /etc/apt/sources.list.d/owncloud-client.list
# apt-get update
# wget https://download.opensuse.org/repositories/isv:ownCloud:desktop/Debian_8.0/Release.key
# apt-key add - < Release.key
# apt-get install owncloud-client

enjoy 😉